
文章目录
-
-
- 相机 内参 && 外参
- 5.1.2 畸变模型
- 单目相机的成像过程
- 5.1.3 双目相机模型
- 5.1.4 RGB-D 相机模型
- 实践
-
- 5.3.1 OpenCV 基础操作 【Code】
-
- OpenCV版本查看
- 5.3.2 图像去畸变 【Code】
- 5.4.1 双目视觉 视差图 点云 【Code】
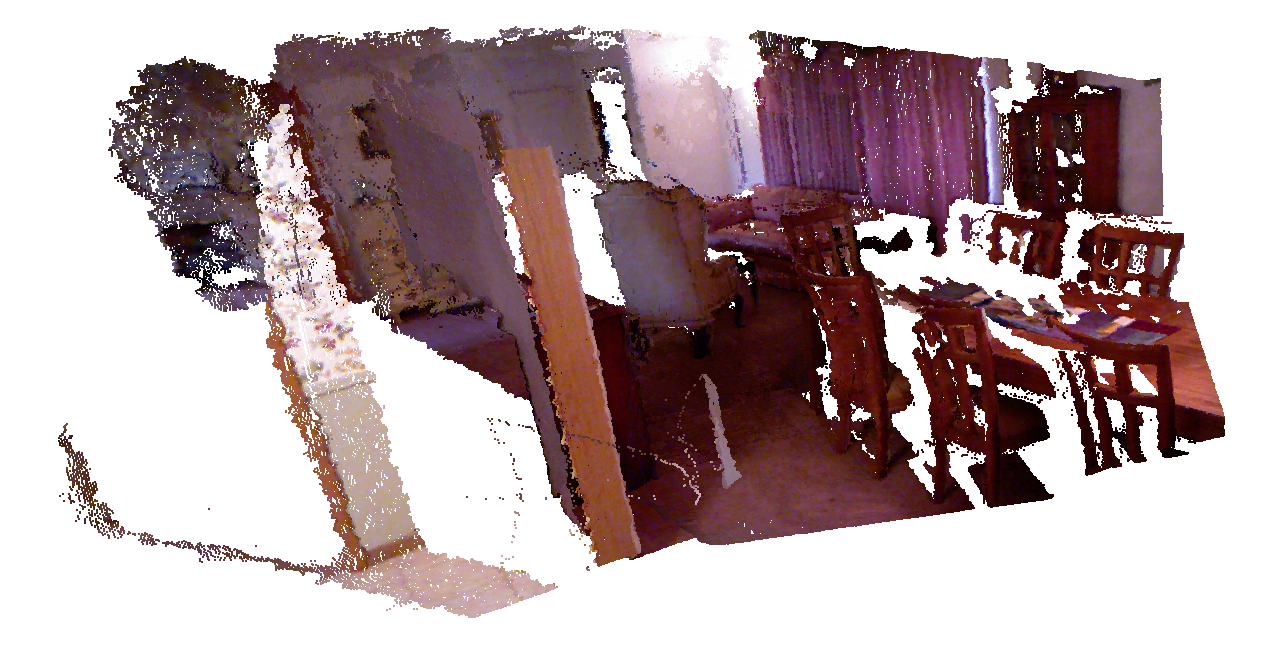
- 5.4.2 RGB-D 点云 拼合成 地图【Code】
- 习题
-
- 题1
- √ 题2
- 题3
- √ 题4
- 题5
- 题6
- 题7
-
空间点 投影到 相机成像平面
前面内容总结:
1、机器人如何表示自身位姿
视觉SLAM: 观测主要是指 相机成像 的过程。
投影过程描述: 针孔 + 畸变
相机 内参 && 外参
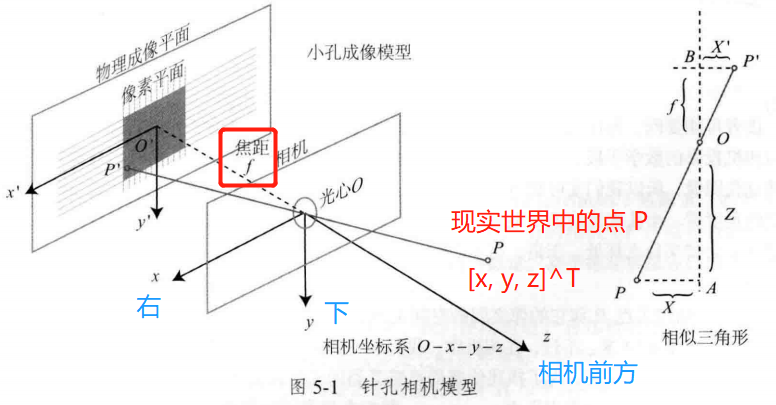

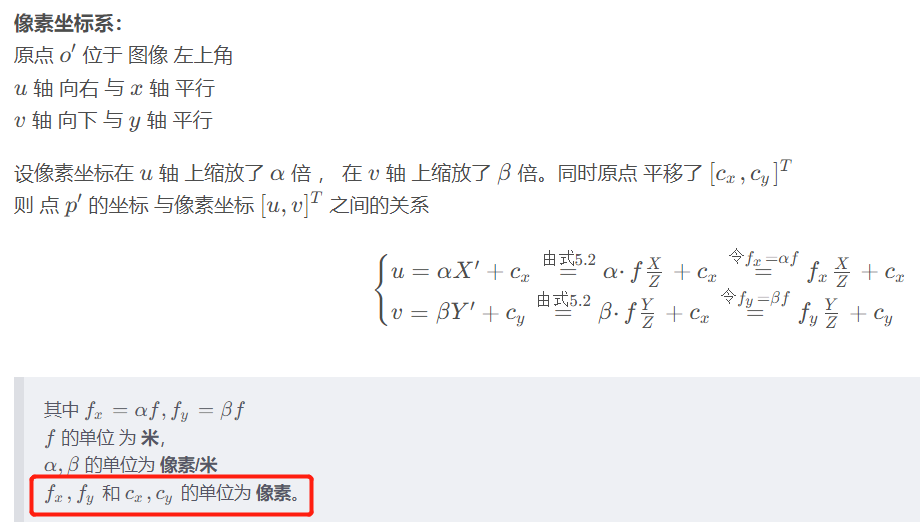
像素坐标系 与 成像平面之间,相差了一个缩放 和一个原点的平移。
像素坐标系:
原点
o
′
o^{prime}
o′ 位于 图像 左上角
u
u
u 轴 向右 与
x
x
x 轴 平行
v
v
v 轴 向下 与
y
y
y 轴 平行
设像素坐标在
u
u
u 轴 上缩放了
alpha
倍 , 在
v
v
v 轴 上缩放了
beta
倍。同时原点 平移了
[
c
x
,
c
y
]
T
[c_x, c_y]^T
[cx,cy]T
则 点
p
′
p^{prime}
p′ 的坐标 与像素坐标
[
u
,
v
]
T
[u, v]^T
[u,v]T 之间的关系
{
u
=
X
′
+
c
x
=
由式
5.2
⋅
f
X
Z
+
c
x
=
令
f
x
=
f
f
x
X
Z
+
c
x
v
=
Y
′
+
c
y
=
由式
5.2
⋅
f
Y
Z
+
c
x
=
令
f
y
=
f
f
y
Y
Z
+
c
y
begin{equation*} begin{cases} u = alpha X^{prime} + c_x overset{由式5.2}{=} alpha ffrac{X}{Z} + c_x overset{令f_x = alpha f}{=} f_xfrac{X}{Z} + c_x \ v = beta Y^{prime} + c_y overset{由式5.2}{=} betaffrac{Y}{Z} + c_x overset{令f_y = beta f}{=} f_yfrac{Y}{Z} + c_y end{cases} end{equation*}
{u=X′+cx=由式5.2⋅fZX+cx=令fx=ffxZX+cxv=Y′+cy=由式5.2⋅fZY+cx=令fy=ffyZY+cy
其中
f
x
=
f
,
f
y
=
f
f_x = alpha f, f_y=beta f
fx=f,fy=f
f
f
f 的单位 为 米,
,
alpha, beta
, 的单位为 像素/米
f
x
,
f
y
f_x, f_y
fx,fy 和
c
x
,
c
y
c_x, c_y
cx,cy 的单位为 像素。
[
u
v
1
]
=
[
f
x
0
c
x
0
f
y
c
y
0
0
1
]
[
X
Z
Y
Z
1
]
=
1
Z
[
f
x
0
c
x
0
f
y
c
y
0
0
1
]
[
X
Y
Z
]
=
d
e
f
1
Z
K
P
begin{align*}begin{bmatrix}u\ v\ 1end{bmatrix} &=begin{bmatrix}f_x & 0 & c_x\ 0 & f_y & c_y\ 0 & 0 &1end{bmatrix}begin{bmatrix}frac{X}{Z}\ frac{Y}{Z}\ 1end{bmatrix}\ &=frac{1}{Z}begin{bmatrix}f_x & 0 & c_x\ 0 & f_y & c_y\ 0 & 0 &1end{bmatrix}begin{bmatrix}X\ Y\ Zend{bmatrix}\ &overset{mathrm{def}}{=} frac{1}{Z}bm{KP} end{align*}
uv1
=
fx000fy0cxcy1
ZXZY1
=Z1
fx000fy0cxcy1
XYZ
=defZ1KP
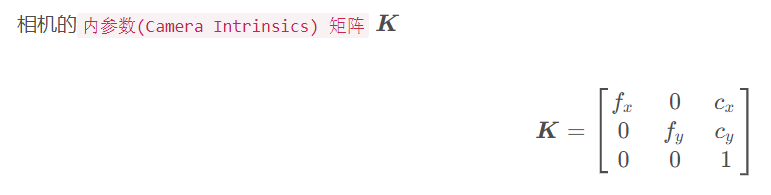
相机的内参数(Camera Intrinsics) 矩阵
K
bm{K}
K
K
=
[
f
x
0
c
x
0
f
y
c
y
0
0
1
]
bm{K} = begin{bmatrix}f_x & 0 & c_x\ 0 & f_y & c_y\ 0 & 0 &1end{bmatrix}
K=
fx000fy0cxcy1
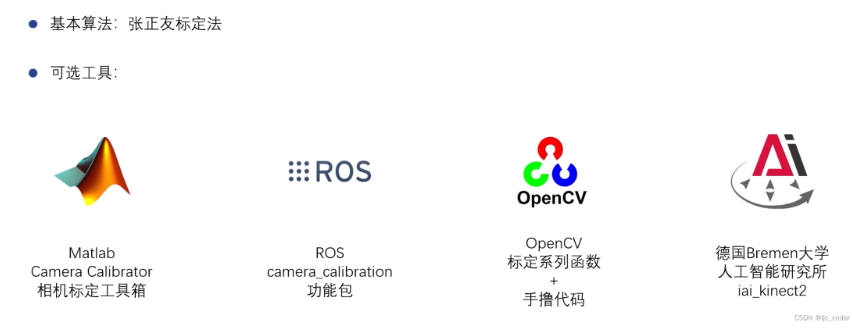
标定:自己确定相机的内参【相机生产厂商未告知相机内参的情形】
- 标定算法: 单目棋盘格张正友标定法
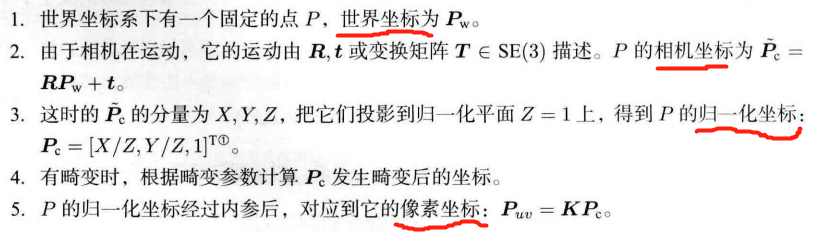
相机在运动 ——>
P
P
P 的相机坐标 = 其世界坐标
P
w
bm{P_mathrm{w}}
Pw 根据相机位姿转换到 相机坐标系下。
Z
P
u
v
=
Z
[
u
v
1
]
=
K
(
R
P
w
+
t
)
=
K
T
P
w
Zbm{P}_{uv}=Zbegin{bmatrix} u \v \1end{bmatrix}=bm{K(RP_{mathrm{w}}+t)=KTP_mathrm{w}}
ZPuv=Z
uv1
=K(RPw+t)=KTPw
相机的外参数(Camera Extrinsics):相机的位姿
R
bm{R}
R ,
t
bm{t}
t
机器人 或 自动驾驶: 外参 = 相机坐标系 到机器人本体坐标系 之间的 变换。
- 描述 相机安装在什么地方
5.1.2 畸变模型
径向畸变:透镜形状引起的畸变(失真)。坐标点 距离原点的长度发生了变化。
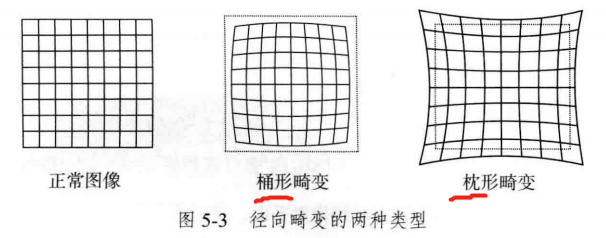
桶形畸变:图像放大率 随着 与光轴之间的距离 增加 而减小。
枕型畸变:图像放大率 随着 与光轴之间的距离 增加 而增加。
- 穿过图像中心和光轴有交点的直线还能保持形状不变。
切向畸变:相机在在组装过程中不能使 透镜和成像面 严格平行。水平夹角发行了变化。

通过5个畸变系数(
k
1
,
k
2
,
k
3
,
p
1
,
p
2
k_1,k_2,k_3,p_1,p_2
k1,k2,k3,p1,p2)找到某个点在像素平面的正确位置:
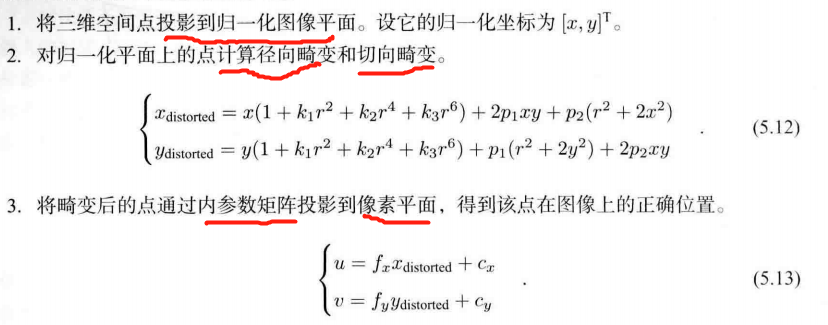
单目相机的成像过程
5.1.3 双目相机模型
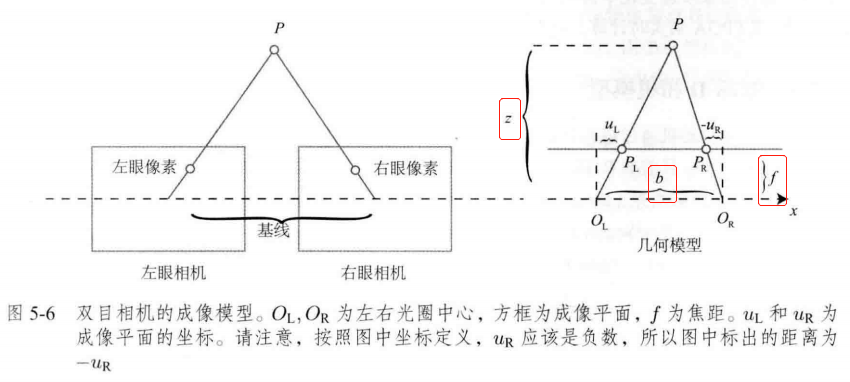
z
−
f
z
=
b
−
u
L
+
u
R
b
frac{z-f}{z}=frac{b-u_L+u_R}{b}
zz−f=bb−uL+uR
令
d
=
u
L
−
u
R
令d = u_L-u_R
令d=uL−uR 视差
则
z
−
f
z
=
b
−
d
b
frac{z-f}{z}=frac{b-d}{b}
zz−f=bb−d
1
−
f
z
=
1
−
d
b
1-frac{f}{z}=1-frac{d}{b}
1−zf=1−bd
f
z
=
d
b
frac{f}{z}=frac{d}{b}
zf=bd
z
=
f
b
d
z=frac{fb}{d}
z=dfb
由于计算量的原因,双目深度估计需要使用 GPU 或 FPGA 来实时计算。
5.1.4 RGB-D 相机模型


RGB-D 相机: 向探测目标 发射一束 光线(通常是红外光)。
RGB-D 不足:
1、用红外光进行深度测量,容易受到 日光或其他传感器发射的红外光干扰。不能在室外使用。
2、多个RGB-D相机之间也会相互干扰。
3、透射材质因为接收不到反射光,无法测量。
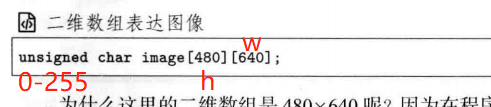
h
h
h 对应 行数
w
w
w 对应 列数
OpenCV: 通道顺序为 BGR

Eigen对于固定大小的矩阵使用起来效率更高。
实践
5.3.1 OpenCV 基础操作 【Code】
OpenCV版本查看
python3 -c "import cv2; print(cv2.__version__)"
可能报错
/home/xixi/Downloads/slambook2-master/ch5/basicuse/basicuse.cpp:6:9: fatal error: opencv2/core/core.cpp: No such file or directory
    6 | #includeopencv2/core/core.cpp>
OpenCV没安装好
gtk/gtk.h报错链接
到 OpenCV 安装包
mkdir build && cd build
cmake ..
make -j4  # 之前 -j8有误,改4试试
sudo make install
——————————————————
mkdir build && cd build
cmake ..
make
./basicuse ubuntu.png   ## ubuntu.png 要放在 build文件夹里; 或者提供该图片的绝对路径;或相对于build文件夹的相对路径
CMakeLists.txt
cmake_minimum_required(VERSION 2.8)

project(basicuse)

# 添加C++ 11 标准支持  nullptr  chrono
set( CMAKE_BUILD_TYPE "Release" )
set( CMAKE_CXX_FLAGS "-std=c++11 -O3" )


# 寻找 OpenCV 库
find_package(OpenCV 4.2.0 REQUIRED)
#添加头文件
include_directories(${OpenCV_INCLUDE_DIRS})


add_executable(basicuse basicuse.cpp)
# 链接OpenCV库
target_link_libraries(basicuse ${OpenCV_LIBS})
basicuse.cpp
#include
#include // 计时

using namespace std;

#include
#include // high-level graphical user interface

using namespace cv;

int main(int argc, char **argv){
    // 读取argv[1] 指定的图像
    cv::Mat image;
    image = cv::imread(argv[1]);  // 从命令行的第一个参数中 读取图像位置

    // 判断图像是否 正确读取
    if (image.data == nullptr){
        cerr  "文件"  argv[1]  "不存在。"  endl;
        return 0;
    }

    // 输出文件的基本信息
    cout  "图像宽为"  image.cols  ",高为"  image.rows
     ", 通道数为"  image.channels()   endl;
    cv::imshow("image", image);
    cv::waitKey(0);  // 暂停程序,等待一个按键输入


    cv::destroyAllWindows();
    return 0;
}

#include
#include // 计时

using namespace std;

#include
#include // high-level graphical user interface

using namespace cv;

int main(int argc, char **argv){
    // 读取argv[1] 指定的图像
    cv::Mat image;
    image = cv::imread(argv[1]);  // 从命令行的第一个参数中 读取图像位置

    // 判断image的类型
    if (image.type() != CV_8UC1 && image.type() != CV_8UC3) {
        // 图像类型不符合要求
        cout  "请输入一张彩色图或灰度图."  endl;
        return 0;
    }

    // 遍历图像, 请注意以下遍历方式亦可使用于随机像素访问
    // 使用 std::chrono 来给算法计时
    chrono::steady_clock::time_point t1 = chrono::steady_clock::now();
    for (size_t y = 0; y  image.rows; y++) {
        // 用cv::Mat::ptr获得图像的行指针
        unsigned char *row_ptr = image.ptrunsigned char>(y);  // row_ptr是第y行的头指针
        for (size_t x = 0; x  image.cols; x++) {
        // 访问位于 x,y 处的像素
        unsigned char *data_ptr = &row_ptr[x * image.channels()]; // data_ptr 指向待访问的像素数据
        // 输出该像素的每个通道,如果是灰度图就只有一个通道
        for (int c = 0; c != image.channels(); c++) {
            unsigned char data = data_ptr[c]; // data为I(x,y)第c个通道的值
        }
        }
    }
    chrono::steady_clock::time_point t2 = chrono::steady_clock::now();
    chrono::durationdouble> time_used = chrono::duration_cast  chrono::duration  double >> (t2 - t1);
    cout  "遍历图像用时:"  time_used.count()  " 秒。"  endl;

    return 0;
}

#include
#include // 计时

using namespace std;

#include
#include // high-level graphical user interface

using namespace cv;

int main(int argc, char **argv){
    // 读取argv[1] 指定的图像
    cv::Mat image;
    image = cv::imread(argv[1]);  // 从命令行的第一个参数中 读取图像位置

    // 关于 cv::Mat 的拷贝
    // 直接赋值并不会拷贝数据   浅拷贝 会 同时修改原始数据
    cv::Mat image_another = image;
    // 修改 image_another 会导致 image 发生变化
    image_another(cv::Rect(0, 0, 100, 100)).setTo(0); // 将左上角100*100的块置零
    cv::imshow("image", image);
    cv::waitKey(0);

    // 使用clone函数来拷贝数据
    cv::Mat image_clone = image.clone();
    image_clone(cv::Rect(0, 0, 100, 100)).setTo(255);
    cv::imshow("image", image);
    cv::imshow("image_clone", image_clone);
    cv::waitKey(0);

    // 对于图像还有很多基本的操作,如剪切,旋转,缩放等,限于篇幅就不一一介绍了,请参看OpenCV官方文档查询每个函数的调用方法.
    cv::destroyAllWindows();

    return 0;
}
5.3.2 图像去畸变 【Code】
cv::Undistort()
CMakeLists.txt
cmake_minimum_required(VERSION 2.8)

project(myOpenCV)

# 添加C++ 11 标准支持  nullptr  chrono
set( CMAKE_BUILD_TYPE "Release" )
set( CMAKE_CXX_FLAGS "-std=c++11 -O3" )


# 寻找 OpenCV 库
find_package(OpenCV 4.2.0 REQUIRED)
#添加头文件
include_directories(${OpenCV_INCLUDE_DIRS})


add_executable(myOpenCV undistortImage.cpp)
# 链接OpenCV库
target_link_libraries(myOpenCV ${OpenCV_LIBS})
undistortImage.cpp
#include
#include

using namespace std;

string image_file = "../distorted.png";   // 请确保路径正确

int main(int argc, char **argv) {

  // 本程序实现去畸变部分的代码。尽管我们可以调用OpenCV的去畸变,但自己实现一遍有助于理解。
  // 畸变参数
  double k1 = -0.28340811, k2 = 0.07395907, p1 = 0.00019359, p2 = 1.76187114e-05;
  // 内参
  double fx = 458.654, fy = 457.296, cx = 367.215, cy = 248.375;

  cv::Mat image = cv::imread(image_file, 0);   // 图像是灰度图,CV_8UC1
  int rows = image.rows, cols = image.cols;
  cv::Mat image_undistort = cv::Mat(rows, cols, CV_8UC1);   // 去畸变以后的图

  // 计算去畸变后图像的内容
  for (int v = 0; v  rows; v++) {
    for (int u = 0; u  cols; u++) {
      // 按照公式,计算点(u,v)对应到畸变图像中的坐标(u_distorted, v_distorted)
      double x = (u - cx) / fx, y = (v - cy) / fy;
      double r = sqrt(x * x + y * y);
      double x_distorted = x * (1 + k1 * r * r + k2 * r * r * r * r) + 2 * p1 * x * y + p2 * (r * r + 2 * x * x);
      double y_distorted = y * (1 + k1 * r * r + k2 * r * r * r * r) + p1 * (r * r + 2 * y * y) + 2 * p2 * x * y;
      double u_distorted = fx * x_distorted + cx;
      double v_distorted = fy * y_distorted + cy;

      // 赋值 (最近邻插值)
      if (u_distorted >= 0 && v_distorted >= 0 && u_distorted  cols && v_distorted  rows) {
        image_undistort.atuchar>(v, u) = image.atuchar>((int) v_distorted, (int) u_distorted);
      } else {
        image_undistort.atuchar>(v, u) = 0;
      }
    }
  }

  // 画图去畸变后图像
  cv::imshow("distorted", image);
  cv::imshow("undistorted", image_undistort);
  cv::waitKey();
  return 0;
}

5.4.1 双目视觉 视差图 点云 【Code】


CMakeLists.txt
cmake_minimum_required(VERSION 2.8)

project(stereoVision)

# 添加C++ 11 标准支持  nullptr  chrono
set( CMAKE_BUILD_TYPE "Release" )
set( CMAKE_CXX_FLAGS "-std=c++11 -O3" )


# 寻找 OpenCV 库
find_package(OpenCV 4.2.0 REQUIRED)
#添加头文件
include_directories(${OpenCV_INCLUDE_DIRS})

find_package(Pangolin REQUIRED)

add_executable(stereoVision stereoVision.cpp)
target_link_libraries(stereoVision ${OpenCV_LIBS} ${Pangolin_LIBRARIES})
stereoVision.cpp
#include
#include
#include
#include
#include
#include
using namespace std;
using namespace Eigen;
// 文件路径
string left_file = "../left.png";
string right_file = "../right.png";
// 在pangolin中画图,已写好,无需调整
void showPointCloud(
const vectorVector4d, Eigen::aligned_allocatorVector4d>> &pointcloud);
int main(int argc, char **argv) {
// 内参
double fx = 718.856, fy = 718.856, cx = 607.1928, cy = 185.2157;
// 基线
double b = 0.573;
// 读取图像
cv::Mat left = cv::imread(left_file, 0);
cv::Mat right = cv::imread(right_file, 0);
cv::Ptrcv::StereoSGBM> sgbm = cv::StereoSGBM::create(
0, 96, 9, 8 * 9 * 9, 32 * 9 * 9, 1, 63, 10, 100, 32); // 神奇的参数
cv::Mat disparity_sgbm, disparity;
sgbm->compute(left, right, disparity_sgbm);
disparity_sgbm.convertTo(disparity, CV_32F, 1.0 / 16.0f);
// 生成点云
vectorVector4d, Eigen::aligned_allocatorVector4d>> pointcloud;
// 如果你的机器慢,请把后面的v++和u++改成v+=2, u+=2
for (int v = 0; v left.rows; v++)
for (int u = 0; u left.cols; u++) {
if (disparity.atfloat>(v, u) 0.0 || disparity.atfloat>(v, u) >= 96.0) continue;
Vector4d point(0, 0, 0, left.atuchar>(v, u) / 255.0); // 前三维为xyz,第四维为颜色
// 根据双目模型计算 point 的位置
double x = (u - cx) / fx;
double y = (v - cy) / fy;
double depth = fx * b / (disparity.atfloat>(v, u));
point[0] = x * depth;
point[1] = y * depth;
point[2] = depth;
pointcloud.push_back(point);
}
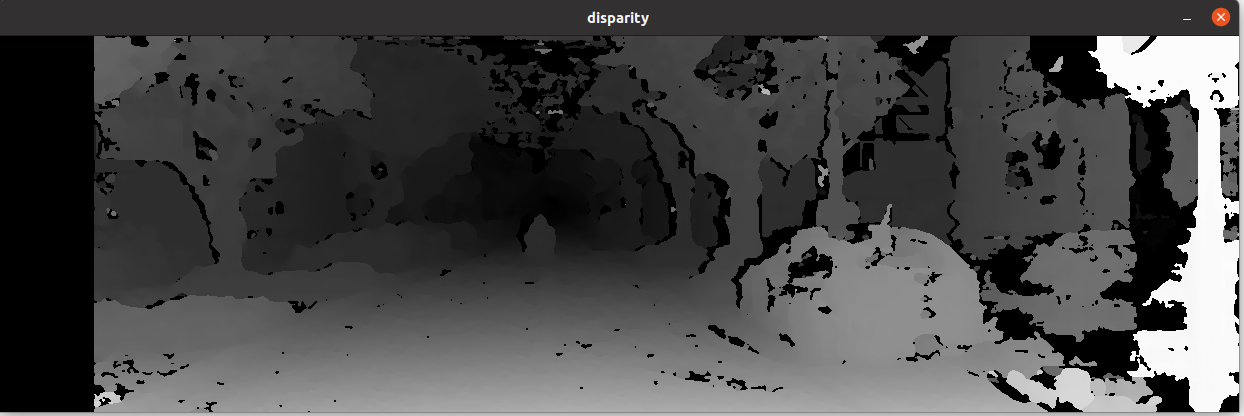
cv::imshow("disparity", disparity / 96.0);
cv::waitKey(0);
// 画出点云
showPointCloud(pointcloud);
return 0;
}
void showPointCloud(const vectorVector4d, Eigen::aligned_allocatorVector4d>> &pointcloud) {
if (pointcloud.empty()) {
服务器托管网 cerr "Point cloud is empty!" endl;
return;
}
pangolin::CreateWindowAndBind("Point Cloud Viewer", 1024, 768);
glEnable(GL_DEPTH_TEST);
glEnable(GL_BLEND);
glBlendFunc(GL_SRC_ALPHA, GL_ONE_MINUS_SRC_ALPHA);
pangolin::OpenGlRenderState s_cam(
pangolin::ProjectionMatrix(1024, 768, 500, 500, 512, 389, 0.1, 1000),
pangolin::ModelViewLookAt(0, -0.1, -1.8, 0, 0, 0, 0.0, -1.0, 0.0)
);
pangolin::View &d_cam = pangolin::CreateDisplay()
.SetBounds(0.0, 1.0, pangolin::Attach::Pix(175), 1.0, -1024.0f / 768.0f)
.SetHandler(new pangolin::Handler3D(s_cam));
while (pangolin::ShouldQuit() == false) {
glClear(GL_COLOR_BUFFER_BIT | GL_DEPTH_BUFFER_BIT);
d_cam.Activate(s_cam);
glClearColor(1.0f, 1.0f, 1.0f, 1.0f);
glPointSize(2);
glBegin(GL_POINTS);
for (auto &p: pointcloud) {
glColor3f(p[3], p[3], p[3]);
glVertex3d(p[0], p[1], p[2]);
}
glEnd();
pangolin::FinishFrame();
usleep(5000); // sleep 5 ms
}
return;
}
视差图:
byzanz-record -x 147 -y 76 -w 1386 -h 768 -d 15 --delay=5 -c /home/xixi/myGIF/test.gif

5.4.2 RGB-D 点云 拼合成 地图【Code】
通过物理方法 获得 像素深度信息


mkdir build && cd build
cmake ..
make
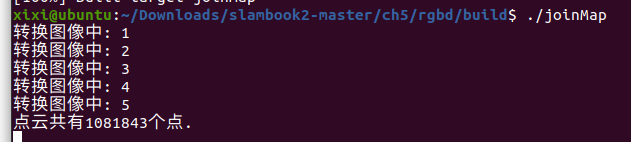
./joinMap
CMakeLists.txt
cmake_minimum_required(VERSION 2.8)

project(joinMap)

# 添加C++ 11 标准支持  nullptr  chrono
set( CMAKE_BUILD_TYPE "Release" )
set( CMAKE_CXX_FLAGS "-std=c++11 -O3" )

# 寻找 OpenCV 库
find_package(OpenCV 4.2.0 REQUIRED)
#添加头文件
include_directories(${OpenCV_INCLUDE_DIRS})

# Sophus 库
find_package(Sophus REQUIRED)
include_directories(${Sophus_INCLUDE_DIRS})

#  Pangolin 库
find_package(Pangolin REQUIRED)
include_directories(${Pangolin_INCLUDE_DIRS})

add_executable(joinMap joinMap.cpp)
target_link_libraries(joinMap ${OpenCV_LIBS} ${Pangolin_LIBRARIES} ${Sophus_LIBRARIES})
# 上面这句 一定要 链接到  Sophus
joinMap.cpp
#include
#include
#include
#include   // for formating strings
#include
#include

using namespace Sophus;  // 原代码少了 这句
using namespace std;
typedef vectorSophus::SE3, Eigen::aligned_allocatorSophus::SE3>> TrajectoryType;
typedef Eigen::Matrixdouble, 6, 1> Vector6d;

// 在pangolin中画图,已写好,无需调整
void showPointCloud(
    const vectorVector6d, Eigen::aligned_allocatorVector6d>> &pointcloud);

int main(int argc, char **argv) {
    vectorcv::Mat> colorImgs, depthImgs;    // 彩色图和深度图
    TrajectoryType poses;         // 相机位姿

    ifstream fin("../pose.txt");
    if (!fin) {
        cerr  "请在有pose.txt的目录下运行此程序"  endl;
        return 1;
    }

    for (int i = 0; i  5; i++) {
        boost::format fmt("../%s/%d.%s"); //图像文件格式  // !! 这里的路径也要改
        colorImgs.push_back(cv::imread((fmt % "color" % (i + 1) % "png").str()));
        depthImgs.push_back(cv::imread((fmt % "depth" % (i + 1) % "pgm").str(), -1)); // 使用-1读取原始图像

        double data[7] = {0};
        for (auto &d:data)
            fin >> d;
        Sophus::SE3 pose(Eigen::Quaterniond(data[6], data[3], data[4], data[5]),
                          Eigen::Vector3d(data[0], data[1], data[2]));
        poses.push_back(pose);
    }

    // 计算点云并拼接
    // 相机内参
    double cx = 325.5;
    double cy = 253.5;
    double fx = 518.0;
    double fy = 519.0;
    double depthScale = 1000.0;
    vectorVector6d, Eigen::aligned_allocatorVector6d>> pointcloud;
    pointcloud.reserve(1000000);

    for (int i = 0; i  5; i++) {
        cout  "转换图像中: "  i + 1  endl;
        cv::Mat color = colorImgs[i];
        cv::Mat depth = depthImgs[i];
        Sophus::SE3 T = poses[i];
        for (int v = 0; v  color.rows; v++)
            for (int u = 0; u  color.cols; u++) {
                unsigned int d = depth.ptrunsigned short>(v)[u]; // 深度值
                if (d == 0) continue; // 为0表示没有测量到
                Eigen::Vector3d point;
                point[2] = double(d) / depthScale;
                point[0] = (u - cx) * point[2] / fx;
                point[1] = (v - cy) * point[2] / fy;
                Eigen::Vector3d pointWorld = T * point;

                Vector6d p;
                p.head3>() = pointWorld;
                p[5] = color.data[v * color.step + u * color.channels()];   // blue
                p[4] = color.data[v * color.step + u * color.channels() + 1]; // green
                p[3] = color.data[v * color.step + u * color.channels() + 2]; // red
                pointcloud.push_back(p);
            }
    }

    cout  "点云共有"  pointcloud.size()  "个点."  endl;
    showPointCloud(pointcloud);
    return 0;
}

void showPointCloud(const vectorVector6d, Eigen::aligned_allocatorVector6d>> &pointcloud) {

    if (pointcloud.empty()) {
        cerr  "Point cloud is empty!"  endl;
        return;
    }

    pangolin::CreateWindowAndBind("Point Cloud Viewer", 1024, 768);
    glEnable(GL_DEPTH_TEST);
    glEnable(GL_BLEND);
    glBlendFunc(GL_SRC_ALPHA, GL_ONE_MINUS_SRC_ALPHA);

    pangolin::OpenGlRenderState s_cam(
        pangolin::ProjectionMatrix(1024, 768, 500, 500, 512, 389, 0.1, 1000),
        pangolin::ModelViewLookAt(0, -0.1, -1.8, 0, 0, 0, 0.0, -1.0, 0.0)
    );

    pangolin::View &d_cam = pangolin::CreateDisplay()
        .SetBounds(0.0, 1.0, pangolin::Attach::Pix(175), 1.0, -1024.0f / 768.0f)
        .SetHandler(new pangolin::Handler3D(s_cam));

    while (pangolin::ShouldQuit() == false) {
        glClear(GL_COLOR_BUFFER_BIT | GL_DEPTH_BUFFER_BIT);

        d_cam.Activate(s_cam);
        glClearColor(1.0f, 1.0f, 1.0f, 1.0f);

        glPointSize(2);
        glBegin(GL_POINTS);
        for (auto &p: pointcloud) {
            glColor3d(p[3] / 255.0, p[4] / 255.0, p[5] / 255.0);
            glVertex3d(p[0], p[1], p[2]);
        }
        glEnd();
        pangolin::FinishFrame();
        usleep(5000);   // sleep 5 ms
    }
    return;
}
byzanz-record -x 72 -y 64 -w 998 -h 605 -d 15 --delay=5 -c /home/xixi/myGIF/test.gif

习题
待做:
- 找OpenCV里的标定 方法
- 整理链接里的内容
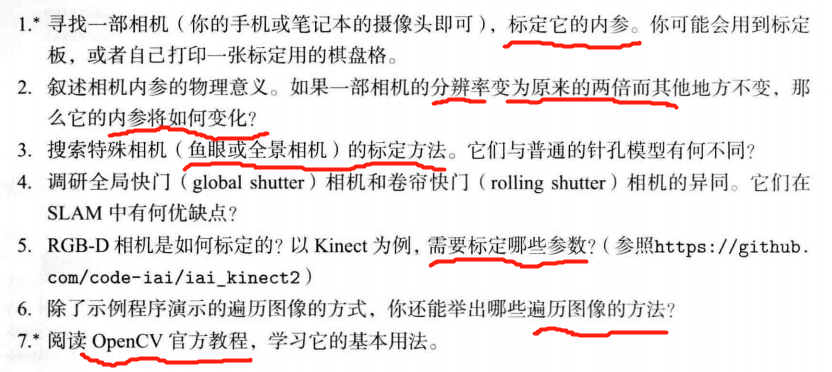
题1
相机内参标定
√ 题2
相机内参
K
bm{K}
K 的物理意义:可将世界坐标系某点
P
P
P 的归一化坐标 转成 像素坐标。
P
u
v
=
K
[
X
/
Z
,
Y
/
Z
,
1
]
T
bm{P_{uv}=K}[X/Z,Y/Z, 1]^T
Puv=K[X/Z,Y/Z,1]T
图像分辨率指图像中存储的信息量,是每英寸图像内有多少个像素点,分辨率的单位为PPI(Pixels Per Inch),通常叫做像素每英寸。
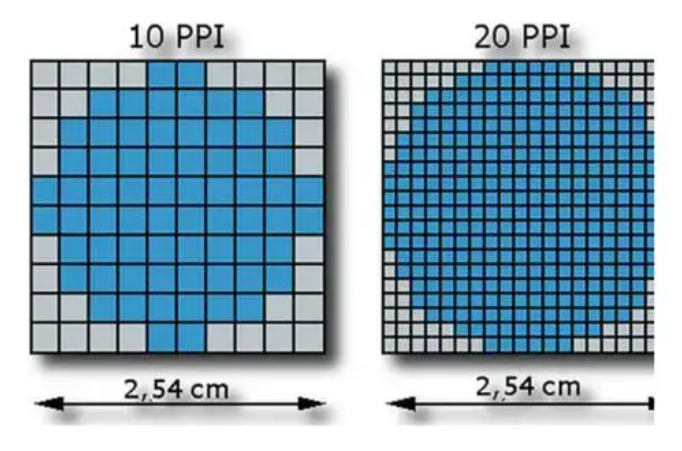
当分辨率变为原来的两倍时, 显然对于同一位置,以像素为单位的
c
x
c_x
cx 和
c
服务器托管网
y
c_y
cy 均变为原来的2倍。而以 像素/每米 为单位的
alpha
和
beta
变成原来的 2 倍。
f
f
f 不变,则
f
x
=
f
f_x = alpha f
fx=f 和
f
y
=
f
f_y = beta f
fy=f 也变为原来的 2 倍。
综上:当相机的分辨率变为原来的2倍时,
c
x
c_x
cx ,
c
y
c_y
cy ,
f
x
f_x
fx ,
f
y
f_y
fy 均变为原来的 2 倍。
题3
鱼眼或全景相机 标定
链接1
链接2
————————————
√ 题4
异同:
工业相机常见的曝光方式:
1、全局曝光(Global shutter,也称全局快门、帧曝光)
- 当光圈打开时,工业相机中的图像传感器上所有像素点可以在同一时刻曝光,当光圈关闭后,所有像素同时结束曝光,然后输出像素数据。全局曝光的工业相机可以一次拍摄物体的整体图像后再输出,因此在拍摄高速运动物体时图像不会偏移,能够达到无失真的效果。
-
CCD(电荷耦合)元件 为这种曝光 方式
2、卷帘曝光(Rolling shutter,也称卷帘快门、行曝光)
- 采用的是逐行扫描逐行曝光的方式,当上一行的所有像素同时曝光后,下一行的所有像素再同时曝光,直至所有行曝光完成。
- 当曝光不当或物体移动较快时,会出现部分曝光(partial exposure)、斜坡图形(skew)、晃动(wobble) 等现象。这种Rolling shutter方式拍摄出现的现象,称为“果冻效应”。
- 大部分
CMOS相机使用卷帘快门(rolling shutter)
3、基于卷帘曝光并结合全局曝光优势的全局复位释放曝光(Global Reset Release Shutter,GRR)
优缺点:
Global shutter适用于拍摄高速运动物体;且在光线有明暗变化的时候,Global shutter sensor不会有明暗瑕疵。
Global shutter需要对每个像素都要增加一个存储单元,这样增加了sensor的生产难度以及成本。
Rolling Shuttersensor适用于拍摄运动速度相对较慢的物体或场景,可获得更高的成像信噪比。 Rolling Shutter 在低噪、像素损失、高感、动态范围等有优势。
————————
题5
RGB-D 相机标定
链接
链接2
题6
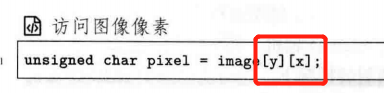
遍历图像的方法
链接
链接2
题7
OpenCV官方教程学习
官方文档
服务器托管,北京服务器托管,服务器租用 http://www.fwqtg.net