前言:
树莓派上的WIFI驱动类型比较多,经常有更好驱动的需求
本文给出RealTek的无线WIFI模组,8821CU的驱动更新办法
步骤
第一 通过其他方式连接网络
小车通过网线或者老的WIFI连接到网络上
第二 构建驱动模块并下载驱动
首先,我们需要打开一个ubuntu的命令行窗口;进入bash,
用三个键的联合命令,就可以打开
【CTRL】+【Alt】+【T】
-
构建一个存放驱动模块的文件夹
mkdir -p ~/8821CU/
cd ~/8821CU
2.下载模块
git clone https://github.com/brektrou/rtl8821CU.git3 进入刚才文件夹
cd rtl8821CU4.进入Jetbot的驱动配置目录,准备构建新的驱动模块,执行下面两行命令
sudo cp /lib/modules/$(uname -r)/build/arch/arm64/Makefile /lib/modules/$(uname -r)/build/arch/arm64/Makefile.$(date +%Y%m%d%H%M)
sudo sed -i 's/-mgeneral-regs-only//' /lib/modules/$(uname -r)/build/arch/arm64/Makefile
5.更新新的驱动模块
sudo apt-get install nano
nano ~/8821CU/rtl8821CU/Makefile
6.修改编译文件Makefile
将文件中102行左右的配置,
##################### Platform Related #######################
CONFIG_PLATFORM_I386_PC = y
CONFIG_PLATFORM_ARM_RPI = n
CONFIG_PLATFORM_ARM64_RPI = n
CONFIG_PLATFORM_ANDROID_X86 = n
CONFIG_PLATFORM_ANDROID_INTEL_X86 = n
CONFIG_PLATFORM_JB_X86 = n
CONFIG_PLATFORM_ARM_S3C2K4 = n
改为
##################### Platform Related #######################
CONFIG_PLATFORM_I386_PC = n
CONFIG_PLATFORM_ARM_RPI = n
CONFIG_PLATFORM_ARM64_RPI = y
CONFIG_PLATFORM_ANDROID_X86 = n
CONFIG_PLATFORM_ANDROID_INTEL_X86 = n
CONFIG_PLATFORM_JB_X86 = n
CONFIG_PLATFORM_ARM_S3C2K4 = n
7. 安装DKMS包
7.1 下载
sudo apt-get update
sudo apt-get install dkms7AA
7.2 配置安装
sudo ./dkms-install.sh
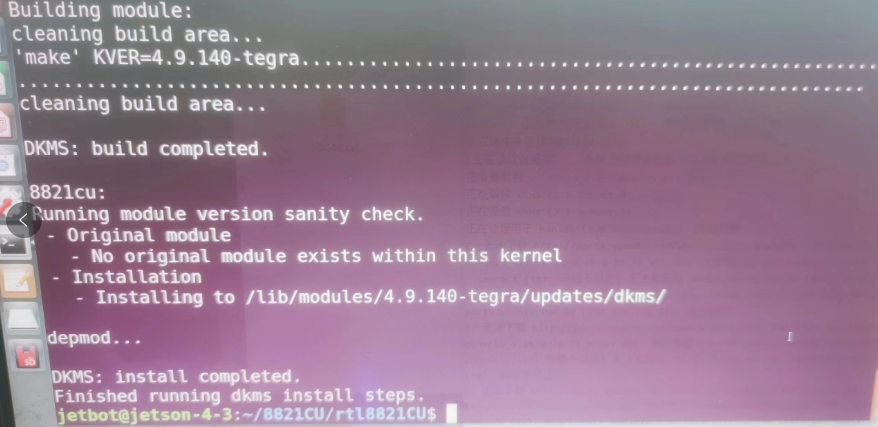
安装成功如下;

第三,安装硬件WIFI模块

重启Jetson Nano
第四,在Ubuntu里面配置WIFI连接
可能遇到的问题

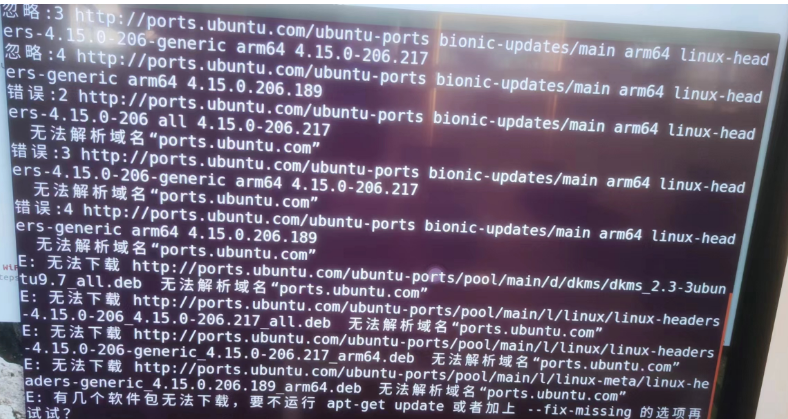
1 DKMS安装无法解析域名 ports.ubuntu
解决办法;就是换成国内的下载源,先把linux header这些先下载了,
1.1 先备份源列表
sudo cp /etc/apt/sources.list /etc/apt/sources.list_backup1.2 更新到清华源
sudo gedit /etc/apt/sources.list# 默认注释了源码镜像以提高 apt update 速度,如有需要可自行取消注释
deb
https://mirrors.tuna.tsinghua.edu.cn/ubuntu/deb https://mirrors.tuna.tsinghua.edu.cn/ubuntu/ xenial main restricted universe multiverse
# deb-src
https://mirrors.tuna.tsinghua.edu.cn/ubuntu/# deb-src https://mirrors.tuna.tsinghua.edu.cn/ubuntu/ xenial main restricted universe multiverse
deb
https://mirrors.tuna.tsinghua.edu.cn/ubuntu/deb https://mirrors.tuna.tsinghua.edu.cn/ubuntu/ xenial-updates main restricted universe multiverse
# deb-src
https://mirrors.tuna.tsinghua.edu.cn/ubuntu/# deb-src https://mirrors.tuna.tsinghua.edu.cn/ubuntu/ xenial-updates main restricted universe multiverse
deb
https://mirrors.tuna.tsinghua.edu.cn/ubuntu/deb https://mirrors.tuna.tsinghua.edu.cn/ubuntu/ xenial-backports main restricted universe multiverse
# deb-src
https://mirrors.tuna.tsinghua.edu.cn/ubuntu/# deb-src https://mirrors.tuna.tsinghua.edu.cn/ubuntu/ xenial-backports main restricted universe multiverse
deb
https://mirrors.tuna.tsinghua.edu.cn/ubuntu/deb https://mirrors.tuna.tsinghua.edu.cn/ubuntu/ xenial-security main restricted universe multiverse
# deb-src
https://mirrors.tuna.tsinghua.edu.cn/ubuntu/# deb-src https://mirrors.tuna.tsinghua.edu.cn/ubuntu/ xenial-security main restricted universe multiverse
这样会装linux header的相关文件

1.3 注意重启网络连接
然后,用一个更新的强制的命令选项 【这个在报错的提示里面有】
1.4 重新安装dkms
然后重新执行;注意这里增加了额外的命令选项
sudo apt-get install dkms --fix-missing如果还有问题,参考以下额外步骤
这部分,因为笔者已经没有问题,所以,没有执行
### Additional steps after plug it in, and was not recognized as a WiFi adapter:

The USB ID is required to be known in order to change it later:

```bash
lsusb
```

In this case my adapter showed up as:

```bash
Bus 001 Device 005: ID 0bda:1a2b Realtek Semiconductor Corp.
```

Later, an utility has to be installed to change the USB behavior:

```bash
sudo apt-get install usb_modeswitch
```

Then, to change the USB behavior the following command has to be executed, note that the vendor and product ID (`-v` and `-p` flags parameters have to match with your device):

```bash
sudo usb_modeswitch -KW -v 0bda -p 1a2b
```

Additionally, the bluetooth service has to be activated if inactive (not really sure why **brektrou** mentions it, but I suspect that is due to some adapters that are a combination of both and may have some relation at deeper level):

```bash
systemctl start bluetooth.service
```

By now, it should work, but this configuration is not permanent.


### Make permanent available the configuration for the WiFi adapter

- The `usb_modeswitch` rules need to be open for modification:

  ```bash
  sudo nano /lib/udev/rules.d/40-usb_modeswitch.rules
  ```

- Append the following prior to `LABEL="modeswitch_rules_end"` line, which is located at the end-of-file. Again, make sure to match the vendor and product ID with your device as previous commands

  ```
  # Realtek 8211CU Wifi AC USB
  ATTR{idVendor}=="0bda", ATTR{idProduct}=="1a2b", RUN+="/usr/sbin/usb_modeswitch -K -v 0bda -p 1a2b"
  ```

Now, configuration is **permanent** on your system.

At this point it should be possible to connect to an WiFi AP by using GUI or CLI.

If you would like to do a headless setup, then follow the instructions at https://www.linuxbabe.com/command-line/ubuntu-server-16-04-wifi-wpa-supplicant. While paying attention to stop NetworkManager process, otherwise it won't let you scan and add your WiFi AP.

```bash
sudo systemctl stop NetworkManager
```


## Sources

- https://github.com/brektrou/rtl8821CU

- https://www.linuxbabe.com/command-line/ubuntu-server-16-04-wifi-wpa-supplicant
参考
Linux 模块管理方法之 DKMS – 知乎 (zhihu.com)
(1条消息) Linux换国内镜像源(Ubuntu、Debian等)_linux换源_Raywit的博客-CSDN博客
服务器托管,北京服务器托管,服务器租用 http://www.fwqtg.net

