本文分享自华为云社区《大语言模型底层原理你都知道吗?大语言模型底层架构之二GPT实现》,作者:码上开花_Lancer 。
受到计算机视觉领域采用ImageNet对模型进行一次预训练,使得模型可以通过海量图像充分学习如何提取特征,然后再根据任务目标进行模型微调的范式影响,自然语言处理领域基于预训练语言模型的方法也逐渐成为主流。以ELMo为代表的动态词向量模型开启了语言模型预训练的大门,此后以GPT 和BERT为代表的基于Transformer 的大规模预训练语言模型的出现,使得自然语言处理全面进入了预训练微调范式新时代。
利用丰富的训练语料、自监督的预训练任务以及Transformer 等深度神经网络结构,预训练语言模型具备了通用且强大的自然语言表示能力,能够有效地学习到词汇、语法和语义信息。将预训练模型应用于下游任务时,不需要了解太多的任务细节,不需要设计特定的神经网络结构,只需要“微调”预训练模型,即使用具体任务的标注数据在预训练语言模型上进行监督训练,就可以取得显著的性能提升。
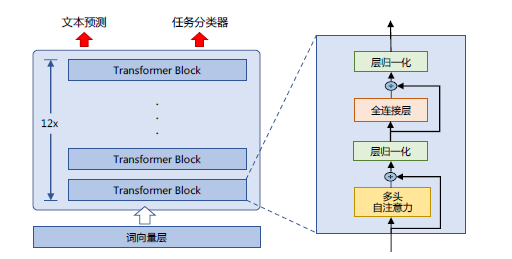
OpenAI 公司在2018 年提出的生成式预训练语言模型(Generative Pre-Training,GPT)是典型的生成式预训练语言模型之一。GPT 模型结构如图2.3所示,由多层Transformer 组成的单向语言模型,主要分为输入层,编码层和输出层三部分。
接下来我将重点介绍GPT 无监督预训练、有监督下游任务微调以及基于HuggingFace 的预训练语言模型实践。
一、 无监督预训练
GPT 采用生成式预训练方法,单向意味着模型只能从左到右或从右到左对文本序列建模,所采用的Transformer 结构和解码策略保证了输入文本每个位置只能依赖过去时刻的信息。
给定文本序列w = w1w2…wn,GPT 首先在输入层中将其映射为稠密的向量:

其中, 是词wi 的词向量,
 是词wi 的位置向量服务器托管网,vi 为第i 个位置的单词经过模型输入层(第0层)后的输出。GPT 模型的输入层与前文中介绍的神经网络语言模型的不同之处在于其需要添加

图1.1 GPT 预训练语言模型结构
位置向量,这是Transformer 结构自身无法感知位置导致的,因此需要来自输入层的额外位置信息。经过输入层编码,模型得到表示向量序列v = v1…vn,随后将v 送入模型编码层。编码层由L 个Transformer 模块组成,在自注意力机制的作用下,每一层的每个表示向量都会包含之前位置表示向量的信息,使每个表示向量都具备丰富的上下文信息,并且经过多层编码后,GPT 能得到每个单词层次化的组合式表示,其计算过程表示如下:

其中 表示第L 层的表示向量序列,n 为序列长度,d 为模型隐藏层维度,L 为模型总层数。GPT 模型的输出层基于最后一层的表示h(L),预测每个位置上的条件概率,其计算过程可以表示为:

其中, 为词向量矩阵,|V| 为词表大小。单向语言模型是按照阅读顺序输入文本序列w,用常规语言模型目标优化w 的最大似然估计,使之能根据输入历史序列对当前词能做出准确的预测:

其中 代表模型参数。也可以基于马尔可夫假设,只使用部分过去词进行训练。预训练时通常使用随机梯度下降法进行反向传播优化该负似然函数。
二、 有监督下游任务微调
通过无监督语言模型预训练,使得GPT 模型具备了一定的通用语义表示能力。下游任务微调(Downstream Task Fine-tuning)的目的是在通用语义表示基础上,根据下游任务的特性进行适配。下游任务通常需要利用有标注数据集进行训练,数据集合使用D 进行表示,每个样例由输入长度为n 的文本序列x = x1x2…xn 和对应的标签y 构成。
首先将文本序列x 输入GPT 模型,获得最后一层的最后一个词所对应的隐藏层输出h(L)n ,在此基础上通过全连接层变换结合Softmax 函数,得到标签预测结果。

其中 为全连接层参数,k 为标签个数。通过对整个标注数据集D 优化如下目标函数
精调下游任务:

下游任务在微调过程中,针对任务目标进行优化,很容易使得模型遗忘预训练阶段所学习到的通用语义知识表示,从而损失模型的通用性和泛化能力,造成灾难性遗忘(Catastrophic Forgetting)问题。因此,通常会采用混合预训练任务损失和下游微调损失的方法来缓解上述问题。在实际应用中,通常采用如下公式进行下游任务微调:

其中 取值为[0,1],用于调节预训练任务损失占比。
三、基于HuggingFace 的预训练语言模型实践
HuggingFace 是一个开源自然语言处理软件库。其的目标是通过提供一套全面的工具、库和模型,使得自然语言处理技术对开发人员和研究人员更加易于使用。HuggingFace 最著名的贡献之一是Transformer 库,基于此研究人员可以快速部署训练好的模型以及实现新的网络结构。除此之外,HuggingFace 还提供了Dataset 库,可以非常方便地下载自然语言处理研究中最常使用的基准数据集。本节中,将以构建BERT 模型为例,介绍基于Huggingface 的BERT模型构建和使用方法。
3.1. 数据集合准备
常见的用于预训练语言模型的大规模数据集都可以在Dataset 库中直接下载并加载。例如,如果使用维基百科的英文语料集合,可以直接通过如下代码完成数据获取:
from datasets import concatenate_datasets, load_dataset
bookcorpus = load_dataset("bookcorpus", split="train")
wiki = load_dataset("wikipedia", "20230601.en", split="train")
# 仅保留'text' 列
wiki = wiki.remove_columns([col for col in wiki.column_names if col != "text"])
dataset = concatenate_datasets([bookcorpus, wiki])
# 将数据集合切分为90% 用于训练,10% 用于测试
d = dataset.train_test_split(test_size=0.1)
接下来将训练和测试数据分别保存在本地文件中
def dataset_to_text(dataset, output_filename="data.txt"):
    """Utility function to save dataset text to disk,
    useful for using the texts to train the tokenizer
    (as the tokenizer accepts files)"""
    with open(output_filename, "w") as f:
        for t in dataset["text"]:
            print(t, file=f)
# save the training set to train.txt
dataset_to_text(d["train"], "train.txt")
# save the testing set to test.txt
dataset_to_text(d["test"], "test.txt")
3.2. 训练词元分析器(Tokenizer)
如前所述,BERT 采用了WordPiece 分词,根据训练语料中的词频决定是否将一个完整的词切分为多个词元。因此,需要首先训练词元分析器(Tokenizer)。可以使用transformers 库中的BertWordPieceTokenizer 类来完成任务,代码如下所示:
special_tokens = [
"[PAD]", "[UNK]", "[CLS]", "[SEP]", "[MASK]", "", ""
]#
if you want to train the tokenizer on both sets
# files = ["train.txt", "test.txt"]
# training the tokenizer on the training set
files = ["train.txt"]
# 30,522 vocab is BERT's default vocab size, feel free to tweak
vocab_size = 30_522
# maximum sequence length, lowering will result to faster training (when increasing batch size)
max_length = 512
# whether to truncate
truncate_longer_samples = False
# initialize the WordPiece tokenizer
tokenizer = BertWordPieceTokenizer()
# train the tokenizer
tokenizer.train(files=files, vocab_size=vocab_size, special_tokens=special_tokens)
# enable truncation up to the maximum 512 tokens
tokenizer.enable_truncation(max_length=max_length)
model_path = "pretrained-bert"
# make the directory if not already there
if not os.path.isdir(model_path):
    os.mkdir(model_path)
# save the tokenizer
tokenizer.save_model(model_path)
# dumping some of the tokenizer config to config file,
# including special tokens, whether to lower case and the maximum sequence length
with open(os.path.join(model_path, "config.json"), "w") as f:
    tokenizer_cfg = {
        "do_lower_case": True,
        "unk_token": "[UNK]",
        "sep_token": "[SEP]",
        "pad_token": "[PAD]",
        "cls_token": "[CLS]",
        "mask_token": "[MASK]",
        "model_max_length": max_length,
        "max_len": max_length,
    }
    json.dump(tokenizer_cfg, f)
# when the tokenizer is trained and configured, load it as BertTokenizerFast
tokenizer = BertTokenizerFast.from_pretrained(model_path)
3.3. 预处理语料集合
在启动整个模型训练之前,还需要将预训练语料根据训练好的Tokenizer 进行处理。如果文档长度超过512 个词元(Token),那么就直接进行截断。数据处理代码如下所示:
def encode_with_truncation(examples):
    """Mapping function to tokenize the sentences passed with truncation"""
    return tokenizer(examples["text"], truncation=True, padding="max_length",
        max_length=max_length, return_special_tokens_mask=True)
def encode_without_truncation(examples):
    """Mapping function to tokenize the sentences passed without truncation"""
    return tokenizer(examples["text"], return_special_tokens_mask=True)
# the encode function will depend on the truncate_longer_samples variable
encode = encode_with_truncation if truncate_longer_samples else encode_without_truncation
# tokenizing the train dataset
train_dataset = d["train"].map(encode, batched=True)
# tokenizing the testing dataset
test_dataset = d["test"].map(encode, batched=True)
if truncate_longer_samples:
    # remove other columns and set input_ids and attention_mask as PyTorch tensors

    train_dataset.set_format(type="torch", columns=["input_ids", "attention_mask"])
    test_dataset.set_format(type="torch", columns=["input_ids", "attention_mask"])
else:
    # remove other columns, and remain them as Python lists
    test_dataset.set_format(columns=["input_ids", "attention_mask", "special_tokens_mask"])
    train_dataset.set_format(columns=["input_ids", "attention_mask", "special_tokens_mask"])
truncate_longer_samples布尔变量来控制用于对数据集进行词元处理的encode() 回调函数。如果设置为True,则会截断超过最大序列长度(max_length)的句子。否则,不会截断。如果设为truncate_longer_samples 为False,需要将没有截断的样本连接起来,并组合成固定长度的向量。
3.4. 模型训练
在构建了处理好的预训练语料之后,就可以开始模型训练。代码如下所示:
# initialize the model with the config
model_config = BertConfig(vocab_size=vocab_size, max_position_embeddings=max_length)
model = BertForMaskedLM(config=model_config)
# initialize the data collator, randomly masking 20% (default is 15%) of the tokens
# for the Masked Language Modeling (MLM) task
data_collator = DataCollatorForLanguageModeling(
    tokenizer=tokenizer, mlm=True, mlm_probability=0.2
)
training_args = TrainingArguments(
    output_dir=model_path, # output directory to where save model checkpoint
    evaluation_strategy="steps", # evaluate each `logging_steps` steps
    overwrite_output_dir=True,
    num_train_epochs=10, # number of training epochs, feel free to tweak
    per_device_train_batch_size=10, # the training batch size, put it as high as your GPU memory fits
    gradient_accumulation_steps=8, # accumulating the gradients before updating the weights
    per_device_eval_batch_size=64, # evaluation batch size
    logging_steps=1000, # evaluate, log and save model checkpoints every 1000 step
    save_steps=1000,
    # load_best_model_at_end=True, # whether to load the best model (in terms of loss)
    # at the end of training
    # save_total_limit=3, # whether you don't have much space so you
    # let only 3 model weights saved in the disk
)
trainer = Trainer(
    model=model,
    args=training_args,
    data_collator=data_collator,
    train_dataset=train_dataset,
    eval_dataset=test_dataset,
)
# train the model
trainer.train()
开始训练后,可以如下输出结果:
[10135/79670 18:53:083.5. 模型使用
基于训练好的模型,可以针对不同应用需求进行使用。
# load the model checkpoint model = BertForMaskedLM.from_pretrained(os.path.join(model_path, "checkpoint-10000")) # load the tokenizer tokenizer = BertTokenizerFast.from_pretrained(model_path) fill_mask = pipeline("fill-mask", model=model, tokenizer=tokenizer) # perform predictions examples = [ "Today's most trending hashtags on [MASK] is Donald Trump", "The [MASK] was cloudy yesterday, but today it's rainy.", ] for example in examples: for prediction in fill_mask(example): print(f"{prediction['sequence']}, confidence: {prediction['score']}") print("="*50)
可以得到如下输出:
today's most trending hashtags on twitter is donald trump, confidence: 0.1027069091796875 today's most trending hashtags on monday is donald trump, confidence: 0.09271949529647827 today's most trending hashtags on tuesday is donald trump, confidence: 0.08099588006734848 today's most trending hashtags on facebook is donald trump, confidence: 0.04266013577580452 today's most trending hashtags on wednesday is donald trump, confidence: 0.04120611026883125 ================================================== the weather was cloudy yesterday, but today it's rainy., confidence: 0.04445931687951088 the day was cloudy yesterday, but today it's rainy., confidence: 0.037249673157930374 the morning was cloudy yesterday, but today it's rainy., confidence: 0.023775646463036537 the weekend was cloudy yesterday, but today it's rainy., confidence: 0.022554103285074234 the storm was cloudy yesterday, but today it's rainy., confidence: 0.019406016916036606 ==================================================本篇文章详细重点介绍GPT 无监督预训练、有监督下游任务微调以及基于HuggingFace 的预训练语言模型实践,下一篇文章我将介绍大语言模型网络结构和注意力机制优化以及相关实践。
参考文章:
- ht服务器托管网tps://zhuanlan.zhihu.com/p/617643272
- https://zhuanlan.zhihu.com/p/604592680
点击关注,第一时间了解华为云新鲜技术~
服务器托管,北京服务器托管,服务器租用 http://www.fwqtg.net
一,前言 既然是复习设备驱动,第一步当然是做一个最简单的基于设备树的驱动applechar,然后insmod和rmmod使用下,接着要回忆下driver和device是怎么match的,且把相关结构体复习下。 看了下结构体发现有点忘记了,另外match的函数也…

