前言
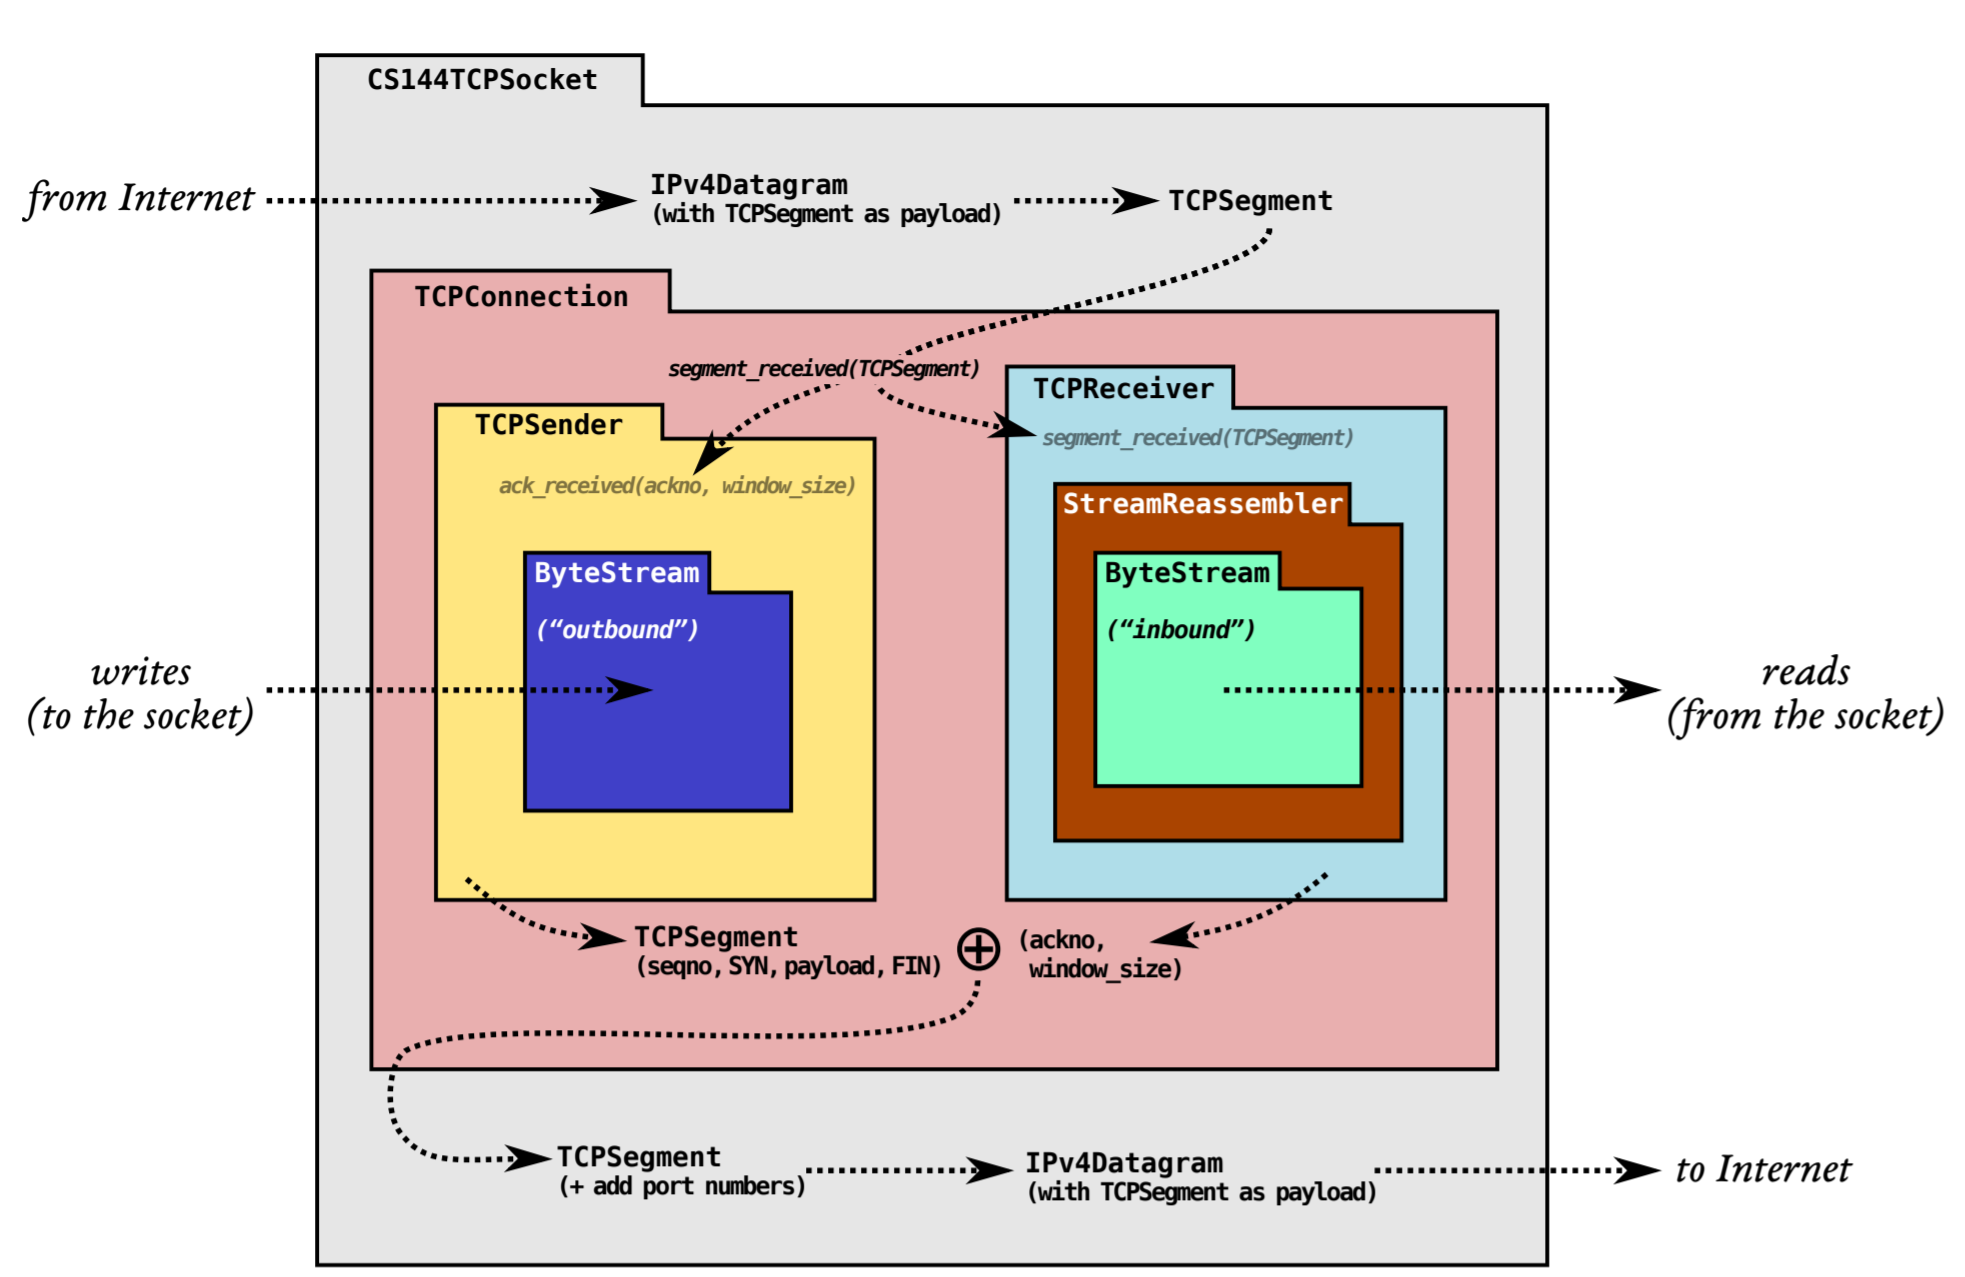
Lab1 中我们使用双端队列实现了字节流重组器,可以将无序到达的数据重组为有序的字节流。Lab2 将在此基础上实现 TCP Receiver,在收到报文段之后将数据写入重组器中,并回复发送方。

实验要求
TCP 接收方除了将收到的数据写入重组器中外,还需要告诉发送发送方:
- 下一个需要的但是还没收到的字节索引
- 允许接收的字节范围
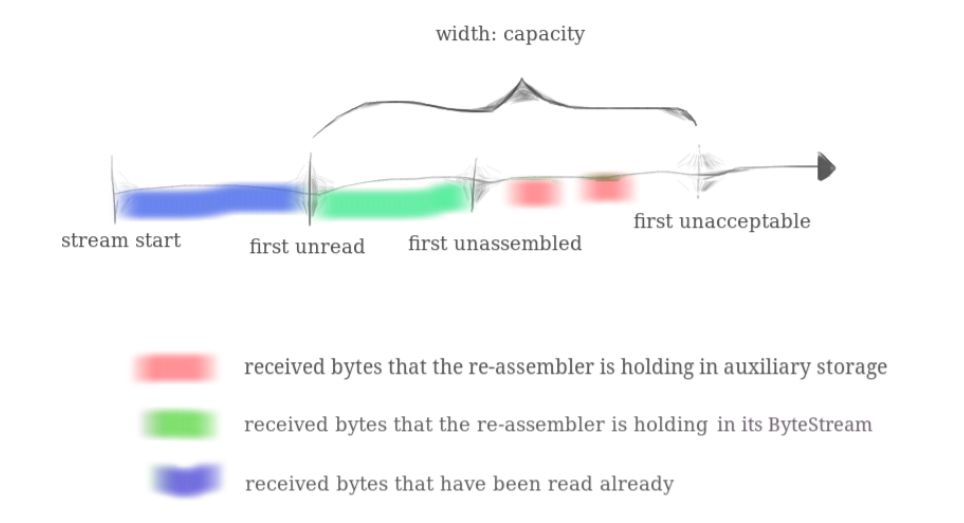
接收方的数据情况如下图所示,蓝色部分表示已消费的数据,绿色表示已正确重组但是还没消费的数据,红色则是失序到达且还没重组的数据。其中 first unassembled 就是还没收到的第一个字节,first unacceptable 就是不允许接收的第一个字节。Lab2 的主要工作就是完成上述两个任务。

索引转换
TCP 三次握手的过程如下图所示(图片来自于小林coding)

客户端随机初始化一个序列号 client_isn,然后将此序号放在报文段的包头上并发给服务端,表示想要建立连接。服务端收到之后也会生成含有随机的序列号 server_isn 和确认应答号 ackno = client_isn + 1 的报文段,并发送给客户端表示接受连接。客户端收到之后就可以开始向服务端发送数据了,数据的第一个字节对应的序列号为 client_isn + 1。
结合 Lab1 中实现的字节流重组器,可以发现,在数据的收发过程中存在几种序列号:
- 序列号
seqno:32bit 无符号整数,从初始序列号 ISN 开始递增,SYN 和 FIN 各占一个编号,溢出之后从 0 开始接着数 - 绝对序列号
absolute seqno:64bit 无符号整数,从 0 开始递增,0 对应 ISN,不会溢出 - 字节流索引
stream index:64bit 无符号整数,从 0 开始递增,不考虑 SYN 报文段,所以 0 对应 ISN + 1,不会溢出
假设 ISN 为 (2^{32}-2),待传输的数据为 cat,那么三种编号的关系如下表所示:

由于 uint32_t 的数值范围为 (0sim 2^{32}-1),所以 a 对应的报文段序列号溢出,又从 0 开始计数了。三者的关系可以表示为:
index = abs_seq-1
]
可以看到,将绝对序列号转为序列号比较简单,只要加上 ISN 并强制转换为 uint32_t 即可:
//! Transform an "absolute" 64-bit sequence number (zero-indexed) into a WrappingInt32
//! param n The input absolute 64-bit sequence number
//! param isn The initial sequence number
WrappingInt32 wrap(uint64_t n, WrappingInt32 isn) { return WrappingInt32{isn + static_cast(n)}; }
要将序列号转换为绝对序列号就比较麻烦了,由于 (kcdot2^{32}) 项的存在,一个序列号可以映射为多个绝对序列号。这时候需要上一个收到的报文段绝对序列号 checkpoint 来辅助转换,虽然我们不能保证各个报文段都是有序到达的,但是相邻到达的报文段序列号差值超过 (2^{32}) 的可能性很小,所以我们可以将离 checkpoint 最近的转换结果作为绝对序列号。
实现方式就是利用上述 wrap() 函数将存档点序列号转为序列号,然后计算新旧序列号的差值,一般情况下直接让存档点序列号加上差值就行,但是有时可能出现负值。比如 ISN 为 (2^{32}-1),checkpoint 和 seqno 都是 0 时,相加结果会是 -1,这时候需要再加上 (2^{32}) 才能得到正确结果。
//! Transform a WrappingInt32 into an "absolute" 64-bit sequence number (zero-indexed)
//! param n The relative sequence number
//! param isn The initial sequence number
//! param checkpoint A recent absolute 64-bit sequence number
//! returns the 64-bit sequence number that wraps to `n` and is closest to `checkpoint`
//!
//! note Each of the two streams of the TCP connection has its own ISN. One stream
//! runs from the local TCPSender to the remote TCPReceiver and has one ISN,
//! and the other stream runs from the remote TCPSender to the local TCPReceiver and
//! has a different ISN.
uint64_t unwrap(WrappingInt32 n, WrappingInt32 isn, uint64_t checkpoint) {
    auto offset = n - wrap(checkpoint, isn);
    int64_t abs_seq = checkpoint + offset;
    return abs_seq >= 0 ? abs_seq : abs_seq + (1ul
在 build 目录输入 ctest -R wrap 测试一下,发现测试用例都顺利通过了:

TCP Receiver
确认应答号
TCP Receiver 在收到报文段之后应该回复给发送方一个确认应答号,告知对方自己接下来需要的但是还没收到的第一字节对应的序列号是多少。假设当前已经收集了 2 个连续的字节,那么 first unassembled 的值就是 2,表明接下来需要索引为 2 的字节,但是以此字节打头的包还没到。由于 SYN 和 FIN 各占一个序列号,所以确认应答号应该是 first unassembled + 1(收到 FIN 之前) 或者 first unassembled + 2(收到 FIN 之后)的转换结果。
//! brief The ackno that should be sent to the peer
//! returns empty if no SYN has been received
//!
//! This is the beginning of the receiver's window, or in other words, the sequence number
//! of the first byte in the stream that the receiver hasn't received.
optional TCPReceiver::ackno() const {
    if (!_is_syned)
        return nullopt;

    return {wrap(_reassembler.next_index() + 1 + _reassembler.input_ended(), _isn)};
}
接收窗口
接收方的缓冲区大小有限,如果应用没有及时消费缓冲区的数据,随着新数据的到来,缓冲区的剩余空间会越来越小直至爆满。为了配合应用程序的消费速度,TCP Receiver 应该告知发送方自己的接收窗口有多大,如果发送方的数据没有落在这个窗口内,就会被丢弃掉。发送方会根据这个窗口的大小调整自己的滑动窗口,以免向网络中发送过多无效数据,这个过程称为流量控制。
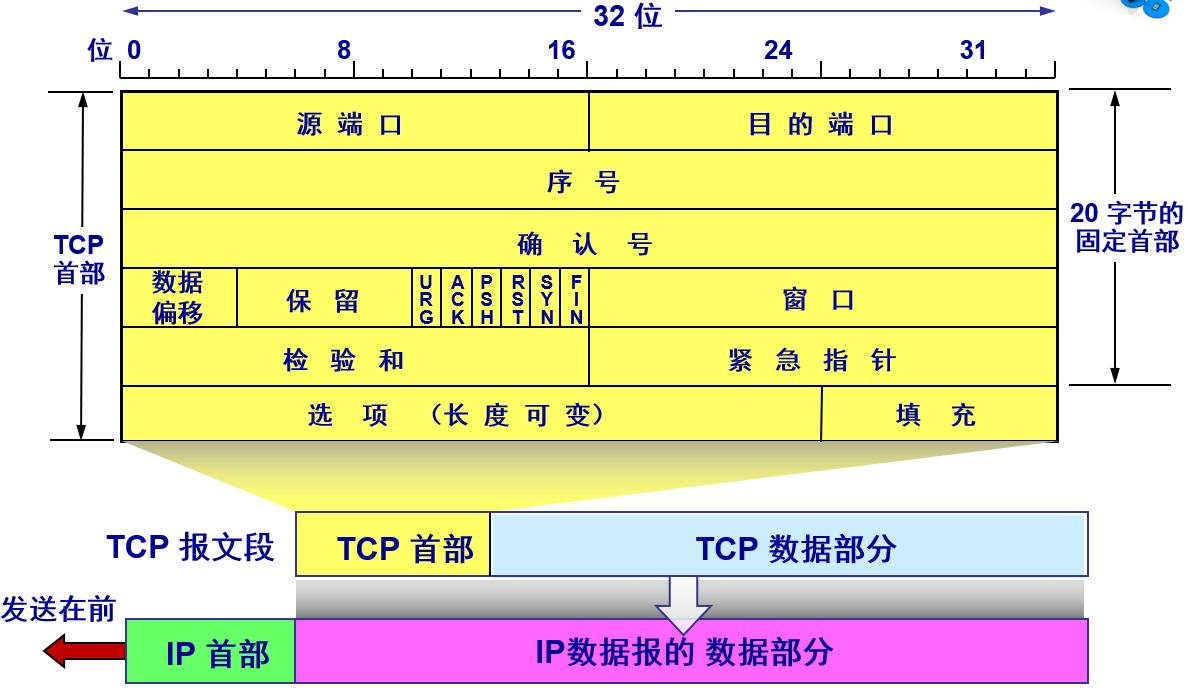
下图展示了 TCP 报文段的结构,可以看到包头的第 15 和 16 个字节组成了窗口大小。

由于窗口大小等于缓冲区的容量减去缓冲区中的数据量,所以 window_size() 的代码为:
//! brief The window size that should be sent to the peer
//!
//! Operationally: the capacity minus the number of bytes that the
//! TCPReceiver is holding in its byte stream (those that have been
//! reassembled, but not consumed).
//!
//! Formally: the difference between (a) the sequence number of
//! the first byte that falls after the window (and will not be
//! accepted by the receiver) and (b) the sequence number of the
//! beginning of the window (the ackno).
size_t TCPReceiver::window_size() const { return _reassembler.stream_out().remaining_capacity(); }
接收报文段
报文段的结构如上图所示,CS144 使用 TCPSegment 类来表示报文段,由 _header 和 _payload 两部分组成:
class TCPSegment {
  private:
    TCPHeader _header{};
    Buffer _payload{};

  public:
    //! brief Parse the segment from a string
    ParseResult parse(const Buffer buffer, const uint32_t datagram_layer_checksum = 0);

    //! brief Serialize the segment to a string
    BufferList serialize(const uint32_t datagram_layer_checksum = 0) const;

    const TCPHeader &header() const { return _header; }
    TCPHeader &header() { return _header; }

    const Buffer &payload() const { return _payload; }
    Buffer &payload() { return _payload; }

    //! brief Segment's length in sequence space
    //! note Equal to payload length plus one byte if SYN is set, plus one byte if FIN is set
    size_t TCPSegment::length_in_sequence_space() const {
    	return payload().str().size() + (header().syn ? 1 : 0) + (header().fin ? 1 : 0);
	}
};
TCPHeader 的结构也很简单,只是把结构中的字节和成员一一对应起来:
struct TCPHeader {
    static constexpr size_t LENGTH = 20;  // header length, not including options

    //! name TCP Header fields
    uint16_t sport = 0;         //!
接受到报文段的时候需要先判断一下是否已建立连接,如果还没建立连接且报文段的 SYN 位不为 1,就丢掉这个报文段。然后再判断一下报文段的数据有没有落在接收窗口内,如果落在窗口内就直接将数据交给重组器处理,同时保存 checkpoint 以供下次使用。
比较奇怪的一种情况是会有 SYN 和 FIN 被同时置位的报文段,这时候得把字节流的写入功能关闭掉:
//! brief handle an inbound segment
//! returns `true` if any part of the segment was inside the window
bool TCPReceiver::segment_received(const TCPSegment &seg) {
    auto &header = seg.header();

    // 在完成握手之前不能接收数据
    if (!_is_syned && !header.syn)
        return false;

    // 丢弃网络延迟导致的重复 FIN
    if(_reassembler.input_ended() && header.fin)
        return false;

    // SYN
    if (header.syn) {

        // 丢弃网络延迟导致的重复 SYN
        if (_is_syned)
            return false;

        _isn = header.seqno;
        _is_syned = true;

        // FIN
        if (header.fin)
            _reassembler.push_substring(seg.payload().copy(), 0, true);

        return true;
    }

    // 分段所占的序列号长度
    size_t seg_len = max(seg.length_in_sequence_space(), 1UL);

    // 将序列号转换为字节流索引
    _checkpoint = unwrap(header.seqno, _isn, _checkpoint);
    uint64_t index = _checkpoint - 1;

    // 窗口右边界
    uint64_t unaccept_index = window_size() + _reassembler.next_index();

    // 序列号不能落在窗口外
    if (seg_len + index = unaccept_index)
        return false;

    // 保存数据
    _reassembler.push_substring(seg.payload().copy(), index, header.fin);
    return true;
}
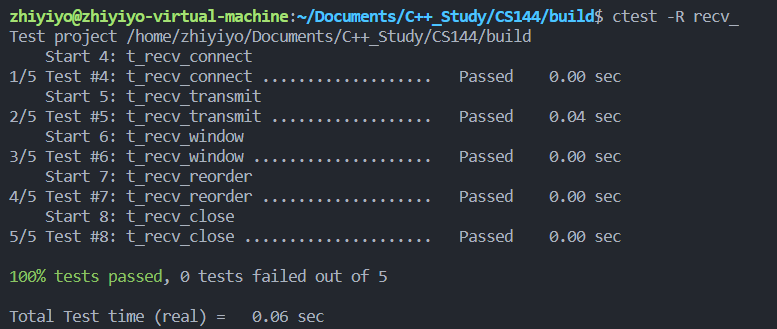
在 build 目录下输入 ctest -R recv_ 或者 make check_lab2,发现各个测试用例也都顺利通过:

后记
通过这次实验,可以加深对报文段结构、各种序列号和流量控制机制的理解,期待下次实验,以上~
服务器托管,北京服务器托管,服务器租用 http://www.fwqtg.net
机房租用,北京机房租用,IDC机房托管, http://www.e1idc.net

