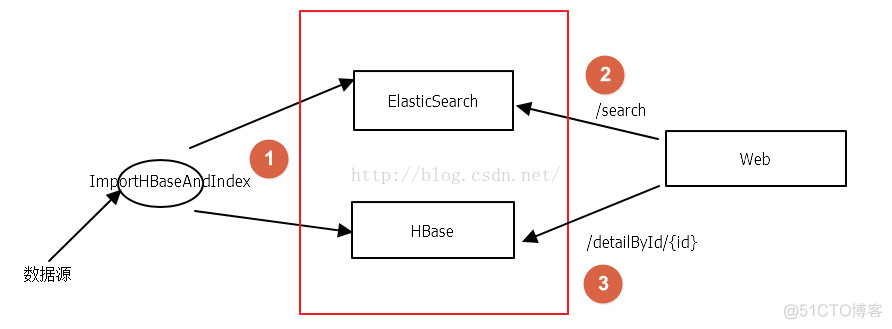
1:设计索引库的settings信息的mappings信息,并把这些配置信息保存到一个配置文件中。
1.1 vi articles.json
{
    "settings":{
         "number_of_shards":3,
         "number_of_replicas":1
    },
    "mappings":{
         "article":{
             "dynamic":"strict",
             "properties":{
                 "id":{"type":"integer","store":"yes"},
                 "title":{"type":"string","store":"yes","index":"analyzed","analyzer":" ik"},
                 "describe":{"type":"string","store":"yes","index":"analyzed","analyzer":" ik"},
                 "author":{"type":"string","store":"yes","index":"no"}
             }
         }
    }
}
其中: dynamic:strict 表示禁用ElasticSearch动态匹配字段类型,title和describe使用
ik
分词
1.2 命令行创建索引
curl -XPUT 'localhost:9200/articles/' -d'{"settings":{"number_of_shards":3,"number_of_replicas":1}}'
2:安装配置
es
服务。
1):整合IK中文分词工具
3:启动
es
。
4:创建索引库
使用开始定义的文件进行创建,使用下面命令进行创建
curl -XPOST ' localhost:9200/articles' -d @articles.json
5:初始化数据

把原始数据在 es
中建立索引,并且还要在
hbase
中保存一份。
需要使用提供的代码里面的一个类(DataImportHBaseAndIndex.java)
public class DataImportHBaseAndIndex {

    public static final String FILE_PATH= "D:/bigdata/es_hbase/datasrc/article.txt" ;
    public static void main(String[] args) throws java.lang.Exception {
          // 读取数据源
         InputStream in = new FileInputStream(new File(FILE_PATH ));
         BufferedReader bufferedReader = new BufferedReader(new InputStreamReader(in ,"UTF-8" ));
         String line = null;
         List articleList = new ArrayList();
         Article article = null;
          while ((line = bufferedReader .readLine()) != null) {
             String[] split = StringUtils.split(line, "t");
              article = new Article();
              article.setId( new Integer(split [0]));
              article.setTitle( split[1]);
              article.setAuthor( split[2]);
              article.setDescribe( split[3]);
              article.setContent( split[3]);
              articleList.add(article );
         }

          for (Article a : articleList ) {
              // HBase插入数据
             HBaseUtils hBaseUtils = new HBaseUtils();
              hBaseUtils.put(hBaseUtils .TABLE_NAME , String.valueOf(a.getId()), hBaseUtils.COLUMNFAMILY_1 ,
                      hBaseUtils.COLUMNFAMILY_1_TITLE , a .getTitle());
              hBaseUtils.put(hBaseUtils .TABLE_NAME , String.valueOf(a.getId()), hBaseUtils.COLUMNFAMILY_1 ,
                      hBaseUtils.COLUMNFAMILY_1_AUTHOR , a.getAuthor());
              hBaseUtils.put(hBaseUtils .TABLE_NAME , String.valueOf(a.getId()), hBaseUtils.COLUMNFAMILY_1 ,
                      hBaseUtils.COLUMNFAMILY_1_DESCRIBE , a.getDescribe());
              hBaseUtils.put(hBaseUtils .TABLE_NAME , String.valueOf(a.getId()), hBaseUtils.COLUMNFAMILY_1 ,
                      hBaseUtils.COLUMNFAMILY_1_CONTENT , a.getContent());

              // ElasticSearch 插入数据
             EsUtil. addIndex(EsUtil.DEFAULT_INDEX, EsUtil.DEFAULT_TYPE , a );
         }
    }
}
注意:
(1)使用 hbaseutils
工具类的时候,要注意修改
zk
的IP地址和hbase.rootdir的地址
还需要在集群中创建一个表(HBase集群):
(2) 使用 es
工具类的时候要注意:
addIndex方法需要实现
/**
     * 向ElasticSearch添加索引
     *
     * @param index
     *            索引库名称
     * @param type
     *            搜索类型
     * @param article
     *            数据
     * @return 当前doc的id
     */
    public static String addIndex(String index , String type, Article article ) {

         HashMap hashMap = new HashMap();
          hashMap.put( "id", article .getId());
          hashMap.put( "title", article .getTitle());
          hashMap.put( "describe", article.getDescribe());
          hashMap.put( "author", article .getAuthor());
         IndexResponse response = getInstance().prepareIndex(index, type, String.valueOf(article.getId())).setSource( hashMap).get();
          return response .getId();
    }
6: Es
工具类中的search方法是否已经完善。
/**
* ElasticSearch查询
*
* @param skey
* 搜索关键字
* @param index
* 索引库
* @param type
* 类型
* @param start
* 开始下标
* @param row
* 每页显示最大记录书
* @return 数据记录
*/
public static Map search(String skey, String index , String type, Integer start, Integer row) {
HashMap dataMap = new HashMap();
ArrayList
7:下面就可以使用 jetty
进行启动。
如何安装 jetty
参考:http://eclipse-jetty.github.io/installation.html
8:访问:http://localhost:8080/article
9:如果使用 tomcat
启动这个项目
注意: jdk
使用1.7
tomcat
使用7.0
服务器托管,北京服务器托管,服务器租用 http://www.fwqtg.net
机房租用,北京机房租用,IDC机房托管, http://www.e1idc.net


