上两篇文章主要描述了idea插件工程创建和idea插件的配置,本文继承上述两篇文章,详细描述下插件开发基础的第三块内容。也是开发具体插件功能前必须要了解的内容,否则开发过程中有可能会经常卡壳。
因大部分配置相关的内容在前两篇文章中都已描述过了,所以本文中会着重说明下与配置相关的程序代码,配置相关内容可查看前两篇文章。
术语
- AST:Abstract Syntax Tree
- UAST:Unified Abstract Syntax Tree,An abstraction layer on the different AST
- DOM:Document Object Model
- EDT:Event Dispatch Thread,handles all Swing events
- EP:Extension Point
- ES:External System,allows integrating external project management systems.
- FBI:File Based Index,allows storing key-value information based on the project’s files.
- LVCS:Local History
- LaF:Look and Feel,Defines the visual appearance and behavior of the user interface by use Swing
- JPS:JetBrains Project System
- JBR:JetBrains Runtime
- PSI:Program Structure Interface
- RA:Read Action
- WA:Write Action
- RC:Run Configuration
- SSR:Structural Search and Replace,Allows searching and replacing code
- VCS:Version Control System
- VF:Virtual File
- VFS:Virtual File System
一、插件打包
正式的插件包会有三种形式如下:
1、无依赖的jar包
插件.jar文件与所有必需的捆绑库一起位于插件“根”文件夹下的/lib文件夹中。/lib文件夹中的所有 jar都会自动添加到类路径中:
.IntelliJIDEAx0/
└── plugins
    └── sample.jar
        ├── com/company/sample/SamplePluginService.class
        │   ...
        │   ...
        └── META-INF
            ├── plugin.xml
            ├── pluginIcon.svg
            └── pluginIcon_dark.svg
2、有依赖的jar包
插件.jar文件与所有必需的捆绑库一起位于插件“根”文件夹下的/lib文件夹中。/lib文件夹中的所有 jar都会自动添加到类路径中:
.IntelliJIDEAx0/
└── plugins
    └── sample
        └── lib
            ├── lib_foo.jar
            ├── lib_bar.jar
            │   ...
            │   ...
            └── sample.jar
                ├── com/company/sample/SamplePluginService.class
                │   ...
                │   ...
                └── META-INF
                    ├── plugin.xml
                    ├── pluginIcon.svg
                    └── pluginIcon_dark.svg
3、包含源码的jar包
这种形式主要是为了其它人扩展用,比如定义两个模块API和Implement,需要把API公开时,这样就可以打包在一起供其它人来引用,配置在build.gradle中进行配置:
tasks {
  val createOpenApiSourceJar by registering(Jar::class) {
    // Java sources
    from(sourceSets.main.get().java) {
      include("**/com/example/plugin/openapi/**/*.java")
    }
    destinationDirectory.set(layout.buildDirectory.dir("libs"))
    archiveClassifier.set("src")
  }

  buildPlugin {
    dependsOn(createOpenApiSourceJar)
    from(createOpenApiSourceJar) { into("lib/src") }
  }
}
上述配置将创建一个源JAR,其中包含com.example.plugin.openapi包中的Java文件,并将其添加到所需 example-plugin.zip 中的最终插件 ZIP 分发中!/example-plugin/lib/src目录。
二、依赖管理
1、插件依赖
一个插件可能依赖于其他插件的类,这些插件可能是捆绑的、第三方的或同一作者的。设置其他插件或模块的类的依赖,需要三个必需步骤:1、找到插件 ID;2、项目设置;3、plugin.xml中的声明
找到插件id
- JetBrains 市场上提供的可扩展插件
对于在JetBrains Marketplace上发布的插件:可以打开插件的详细信息页面,然后向下滚动到底部的附加信息部分,最后复制插件 ID;
2、Jetllij IDE捆绑的可扩展插件
常见的插件如下,也可以在build.gradle文件中配置一个listBundledPlugins功能task列出插件列表。
|
Plugin Name |
Plugin ID |
Related Documentation |
|
Copyright |
com.intellij.copyright |
|
|
CSS |
com.intellij.css |
WebStorm Plugin Development |
|
Database Tools and SQL |
com.intellij.database |
DataGrip Plugin Development |
|
IntelliLang |
org.intellij.intelliLang |
Language Injection |
|
Java |
com.intellij.java |
Java |
|
JavaScript and TypeScript |
JavaScript |
WebStorm Plugin Development |
|
Kotlin |
org.jetbrains.kotlin |
Configuring Kotlin Support |
|
Markdown |
org.intellij.plugins.markdown |
|
|
Maven |
org.jetbrains.idea.maven |
|
|
Spring |
com.intellij.spring |
Spring API |
|
Spring Boot |
com.intellij.spring.boot |
Spring Boot |
项目设置
需要分别在build和plugin两个文件中设置要扩展的插件,先在build.gradle中引入插件依赖,然后在plugin.xml中配置具体的扩展。
intellij { plugins.set(listOf("com.example.another-plugin:1.0")) }
plugin.xml中的依赖声明
com.example.another-plugin
依赖插件设置
如下代表表示,指定要依赖的kotlin插件optional=”true”为可选的插件依赖项。在这种情况下,即使依赖的插件没有安装或启用,插件也会加载,但插件的部分功能将不可用。
plugin.xml:主plugin.xml定义了对 Java 插件(插件 IDcom.intellij.java)的必需依赖并注册了相应的com.intellij.annotator扩展。此外,它还指定了对 Kotlin 插件的可选依赖项(插件 IDorg.jetbrains.kotlin):
   com.intellij.java

   org.jetbrains.kotlin

myPluginId-withKotlin.xml:配置文件myPluginId-withKotlin.xml与主plugin.xml文件位于同一目录中。它注册了相应的com.intellij.annotator扩展:

2、依赖冲突解决
因为idea本身集成了一些捆绑的插件,如果自己开发的idea插件扩展了特定插件的特定版本,有可能出现版本冲突等问题。所以此时依赖管理就派上用场了,可以全局配置也可以用类加载器细致管理。
build.gradle全局配置
configurations.all {
   resolutionStrategy.sortArtifacts(ResolutionStrategy.SortOrder.DEPENDENCY_FIRST)
}
自定义类加载器
Thread currentThread = Thread.currentThread();
ClassLoader originalClassLoader = currentThread.getContextClassLoader();
ClassLoader pluginClassLoader = this.getClass().getClassLoader();
try {
  currentThread.setContextClassLoader(pluginClassLoader);
  // code working with ServiceLoader here
} finally {
  currentThread.setContextClassLoader(originalClassLoader);
}
三、插件扩展
监听器和扩展点
1、声明扩展
本质上来说就是基于一个已有的插件进行开发,需要注意在使用时需要在plugin和build文件中添加依赖才会生效,插件一般有三种扩展类型:
- com.intellij.toolWindow:可向IDE两加的工具栏添加按钮
- com.intellij.applicationConfigurable和com.intellij.projectConfigurable:可在idea的settings页面添加一个自定义的插件设置页面;
- 自定义语言插件使用许多扩展点来扩展 IDE 中的各种语言支持功能。
官方提供的扩展点:Extension Point and Listener List | IntelliJ Platform Plugin SDK
开源提供的扩展点:IntelliJ Platform Explorer | JetBrains Marketplace
plugin.xml声明扩展配置如下:

defaultExtensionNs值,如果扩展了idea核心的需要输入com.intellij。如果是其它的非捆绑的扩展输入plugin的具体值,自定义的扩展实现类如下:
public class MyAppStarter implements ApplicationStarter {
    @Override
    public String getCommandName() {
        return null;
    }
}

public class MyProjectTemplatesFactory extends ProjectTemplatesFactory {
    @Override
    public String @NotNull [] getGroups() {
        return new String[0];
    }

    @Override
    public ProjectTemplate @NotNull [] createTemplates(@Nullable String group, @NotNull WizardContext context) {
        return new ProjectTemplate[0];
    }
}
以上是用接口声明的,如果扩展点是使用beanClass属性声明的,则在指定的 bean 类中设置@Attribute注解来设置相应的属性。
2、定义扩展点
通过在您的插件中定义扩展点,可以允许其他插件扩展您的插件的功能。在plugin.xml文件中可把扩展点定义在中,也可以单独定义。扩展点支持动态属性,但由于限制比较多,暂时不建议使用。扩展点的两种定义方式:
Interface扩展点
允许其他插件使用代码扩展您的插件,其他插件将提供实现该接口的类。然后就可以能够调用这些接口上的方法。name属性为此扩展点分配一个唯一的名称,插件内全局唯一,所以建议用类的全限定名。

public class MyBeanClass extends LazyExtensionInstance {

    @Attribute("key")
    public String key;

    @Attribute("implementationClass")
    public String implementationClass;

    public String getKey() {
        return key;
    }

    @Override
    protected @Nullable String getImplementationClassName() {
        return null;
    }
}
Bean扩展点
允许其他插件使用数据扩展您的插件。需要指定扩展类的完全限定名称,其他插件将提供将转换为该类实例的数据。

public class MyInterface {
}
使用扩展点
在另一个插件中使用自定义的扩展点。这里有一个注意点其实是有双层意义,扩展别人的插件或是为了别人扩展插件。但扩展点可以定义但不一定会公布出去,可以查看打包一节。
下图代码中depends值为上面扩展点定义中的插件的id值,也时也可以了解下defaultExtensionNs的使用方法。
  another.plugin


  my.plugin

在代码中拿到扩展点的实例进行编程:
public class MyExtensionUsingService {

  private static final ExtensionPointName EP_NAME =
          ExtensionPointName.create("my.plugin.myExtensionPoint1");

  public void useExtensions() {
    for (MyBeanClass extension : EP_NAME.getExtensionList()) {
      String key = extension.getKey();
      String clazz = extension.getImplementationClassName();
      // ...
    }
  }

}
四、定义服务
可以简单理解为spring中的service,用于处理复杂的逻辑,类似于bean的概念。目的是为了当您的插件调用相应实例的方法时按需加载的插件组件。IntelliJ 平台确保仅加载服务的一个实例,即使它被多次调用也是如此。
服务必须具有用于服务实例化的实现类。服务也可能有一个接口类,用于获取服务实例并提供服务的 API。需要关闭挂钩/清理例程的服务可以实现Disposable并执行必要的工作dispose()。
IntelliJ 平台提供三种类型的服务:应用程序级服务(全局单例)、项目级服务和模块级服务。对于后两者,会为其对应作用域的每个实例创建一个单独的服务实例。
避免或谨慎使用模块级服务,因为它会增加包含许多模块的项目的内存使用量
定义服务有配置和注解两种实现方式:
1、配置服务
配置方式
应用型
public interface MyAppService {
  void doSomething(String param);
}
public class服务器托管网 MyAppServiceImpl implements MyAppService {
  @Override
  public void doSomething(String param) {
    // ...
  }
}
项目型
public interface MyProjectService {
  void doSomething(String param);
}
public class MyProjectServiceImpl {
  private final Project myProject;

  public MyProjectServiceImpl(Project project) {
    myProject = project;
  }

  public void doSomething(String param) {
    String projectName = myProject.getName();
    // ...
  }
}
在plugin.xml中配置上述服务

注解方式
这种方式不需要在plugin.xml中注册,但服务的实现类必须是final类型的。
应用型
@Service
public final class MyAppService {
  public void doSomething(String param) {
    // ...
  }
}
项目型
@Service(Service.Level.PROJECT)
public final class MyProjectService {
  private final Project myProject;

  public MyProjectService(Project project) {
    myProject = project;
  }

  public void doSomething(String param) {
    String projectName = myProject.getName();
    // ...
  }
}
2、获取服务
MyAppService applicationService =
    ApplicationManager.getApplication().getService(MyAppService.class);

MyProjectService projectService =
    project.getService(MyProjectService.class);
或
MyAppService applicationService = MyAppService.getInstance();

MyProjectService projectService = MyProjectService.getInstance(project);
五、侦听器
消息传递基础结构)。侦听器实现必须是无状态的,并且不能实现生命周期(例如,Disposable),可以定义应用程序级和项目级侦听器。
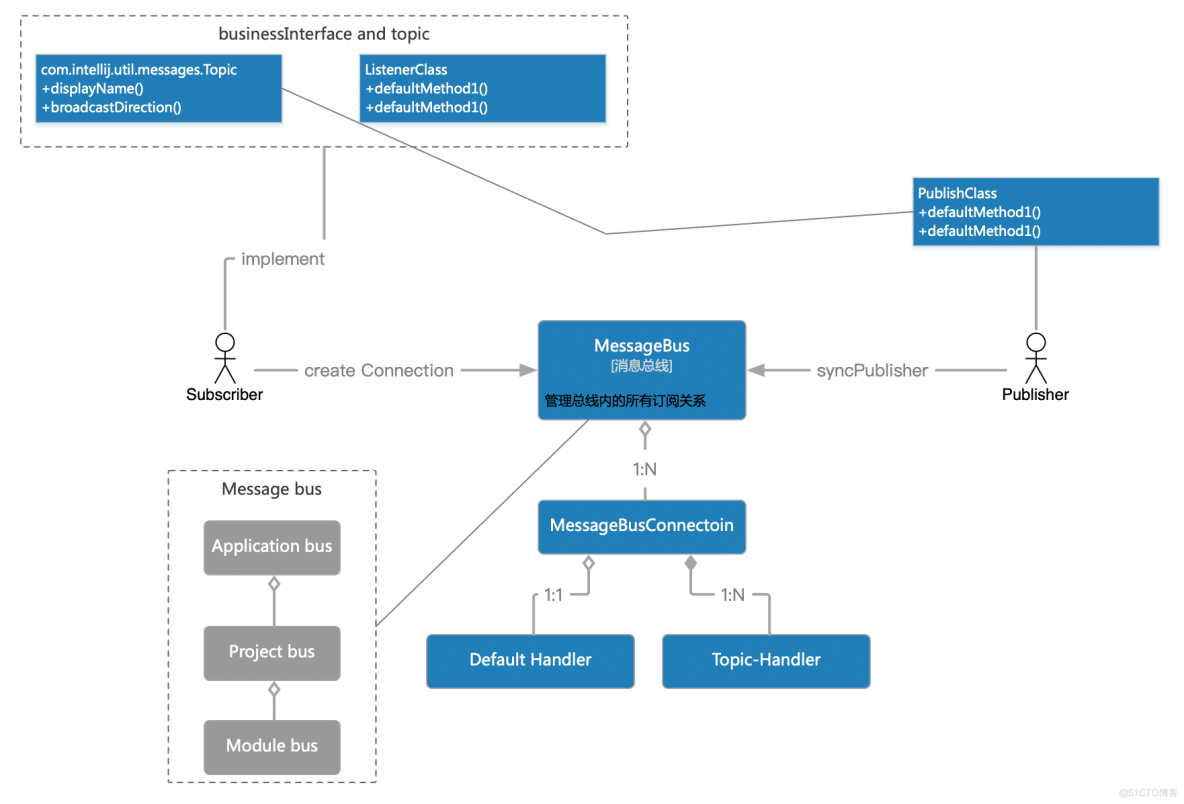
类似于mq的概念,订阅topic然后再实现一个handle处理类。在Idea中侦听器的设计大概如下所示:

 编辑
编辑
1、定义应用程序级侦听器

public class MyVfsListener implements BulkFileListener {

    @Override
    public void after(@NotNull List extends VFileEvent> events) {
        // handle the events
//        events.connect().subscribe(VirtualFileManager.VFS_CHANGES, new BulkFileListener() {
//            @Override
//            public void after(@NotNull List extends VFileEvent> events) {
//                // handle the events
//            }
//        });
    }
}
- topic属性:指定与要接收的事件类型对应的侦听器接口的完全限定名
- class属性:指定插件中实现侦听器接口并接收事件的实现逻辑类
2、定义项目级监听器

public class MyToolWindowListener implements ToolWindowManagerListener {
    private final Project project;

    public MyToolWindowListener(Project project) {
        this.project = project;
    }

    @Override
    public void stateChanged(@NotNull ToolWindowManager toolWindowManager) {
        // handle the state change
    }
}
3、侦听器设置
activeInTestMode和activeInHeadlessMode属性用于设置是否禁用此侦听器,但前提是需要知道Application.isHeadlessEnvironment()和Application.isUnitTestMode()的返回值为ture时相应的属性才会生效。
4、自定义侦听器
定义Topic
public class Notifier {

  @Topic.AppLevel
  public static final Topic FILE_DOCUMENT_SYNC
= new Topic(FileDocumentManagerListener.class,
              Topic.BroadcastDirecti服务器托管网on.TO_DIRECT_CHILDREN,
              true);
   void beforeAction(Context context);
   void afterAction(Context context);
}
实现Subscriber
public class NotifierListener {

    public void init(MessageBus bus) {
        bus.connect().subscribe(Notifier.CHANGE_ACTION_TOPIC,
                new ChangeActionNotifier() {
                    @Override
                    public void beforeAction(Context context) {
                        // Process 'before action' event.
                    }
                    @Override
                    public void afterAction(Context context) {
                        // Process 'after action' event.
                    }
                });
    }
}
实现publisher
public class NotifierPublisher {
    public void doChange(Context context) {
        Notifier publisher =
                ComponentManager.getMessageBus().syncPublisher(Notifier.CHANGE_ACTION_TOPIC);
        publisher.beforeAction(context);
        try {
            // do action
        } finally {
            publisher.afterAction(context);
        }
    }
}
六、设置插件图标
要求:1、尺寸:40 x 40 或80 x 80像素;2、形状:插件Logo周边至少要留2px的透明边距;3、所有插件徽标图像必须为 SVG 格式;3、放在resources/META-INT文件夹下:
- pluginIcon.svg:是默认的插件标志,仅用于浅色IDE 主题,
- pluginIcon_dark.svg:可选的替代插件徽标,仅用于深色 IDE 主题
七、开发插件常见问题
https://plugins.jetbrains.com/docs/intellij/faq.html
服务器托管,北京服务器托管,服务器租用 http://www.fwqtg.net
机房租用,北京机房租用,IDC机房托管, http://www.fwqtg.net

